
Fungal contamination is the quiet disaster that can wreck weeks of work with just a handful of invisible spores. It’s not like a bacterial bloom that clouds your media overnight. Fungi like molds and yeasts are far more insidious, often growing slowly and out of sight, silently compromising your data and torching your budget.
This guide lays out the exact framework we use to get a handle on this risk before it becomes a catastrophe.
Your First Line of Defense Against Fungal Invaders
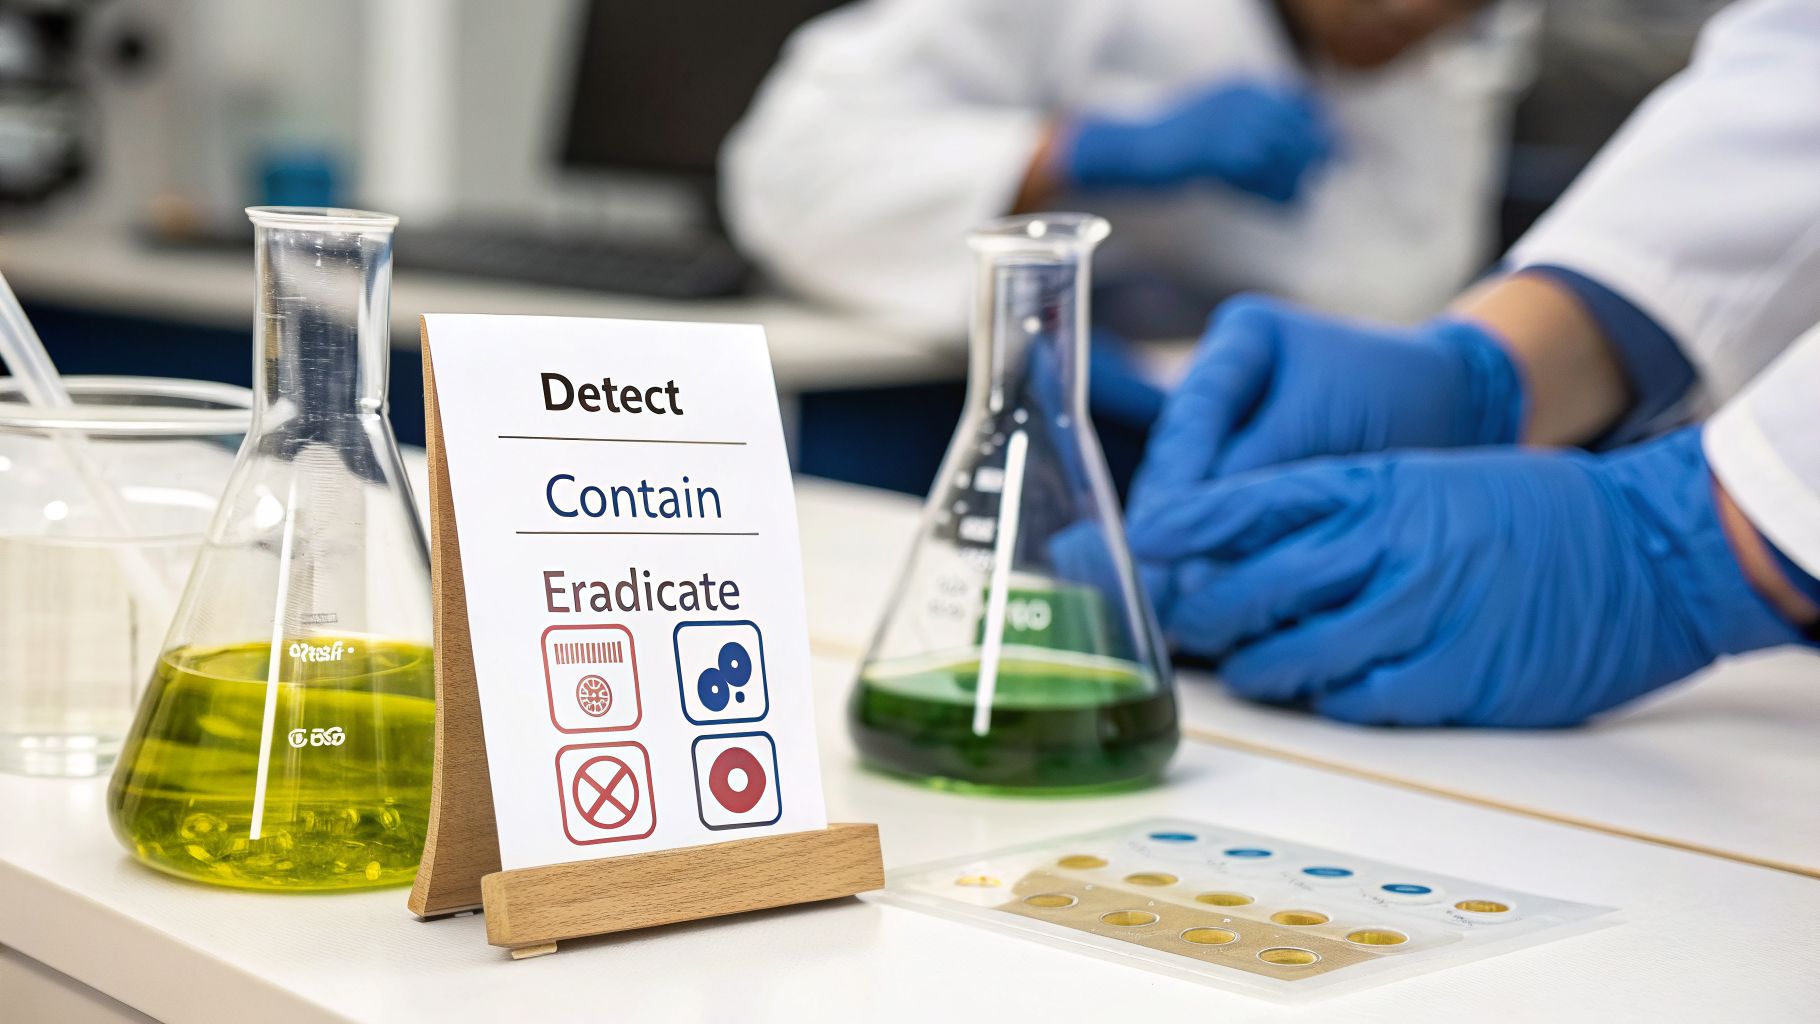
Staring at a fuzzy colony in your T-175 flask can trigger a wave of panic. But a structured response turns that panic into a clear, methodical plan. The strategy I’ve relied on for years boils down to four distinct stages: Detect, Contain, Eradicate, and Prevent.
Think of this as your lab's emergency protocol. It’s a mental map that works whether you're in an academic R&D lab, a high-throughput biomanufacturing facility, or a university core. The goal is to shift from just reacting to a crisis to proactively protecting your work.
The Four-Stage Fungal Contamination Response Framework
A successful strategy isn't about just throwing everything out. It’s a systematic process where each stage builds on the last. This table gives you the high-level workflow we’ll break down in the rest of this guide.
| Stage | Primary Goal | Key Actions |
|---|---|---|
| Detect | Early and accurate identification of the fungus | Visual inspection, microscopic analysis, pH monitoring |
| Contain | Stop the spread to other cultures and equipment | Isolate affected materials, implement strict quarantine |
| Eradicate | Eliminate the fungus from the lab environment | Decontaminate surfaces and equipment, decide to discard or treat cultures |
| Prevent | Build a resilient, contamination-free workspace | Refine aseptic technique, maintain environmental controls |
This framework gives you a reliable structure for tackling a cell culture fungal contamination event head-on. It’s about acting decisively, minimizing the damage, and—most importantly—reinforcing your lab's defenses so it doesn't happen again.
Understanding the Common Culprits
In nearly every cell culture lab, the fight against fungal contamination is constant. Spores are everywhere—in the air, on our clothes, and on lab equipment. This is why it remains a massive headache for mammalian cell research and bioproduction.
According to industry leaders like Thermo Fisher Scientific, the most frequent invaders are molds (think Aspergillus) and yeasts (like Candida). They absolutely thrive in the nutrient-rich, cozy environment we create for our cells.
A single fungal spore landing in your media can multiply into a culture-destroying colony in days. Recognizing that these invaders are ubiquitous in our environment is the first step toward building an effective defense.
This framework isn't just theory. It's about turning a potential crisis into a learning opportunity that makes your entire lab stronger and your science more robust.
Catching a fungal contamination early is the difference between a minor headache and a full-blown lab crisis that costs you weeks of work and expensive reagents. If you’re waiting until your media looks like a murky swamp, you’re already far too late. The real skill is in spotting the subtle, early warning signs that give you a critical window to act decisively.
It’s a routine that should be second nature: a thorough visual check of your flasks and plates, every single day. Don’t just glance—look. This is your first and most important line of defense.
First-Line Visual Inspection
Long before you see a fuzzy colony, your media will often tell you something is wrong. Many fungal contaminants give themselves away through pH shifts, and your eyes are the best tool for spotting them.
Most common media, like DMEM or RPMI-1640, use phenol red as a pH indicator. As your cells metabolize, the media naturally turns from red to orange-yellow. But a sudden, aggressive drop to a bright, almost neon yellow is a huge red flag. This often signals a fast-growing fungus spewing acidic byproducts.
Less common, but still a tell-tale sign, is a drift in the other direction. If your media turns a fuchsia or purplish color, it could indicate a fungus consuming the acidic components of the media, raising the pH. Don't dismiss it.
Key Takeaway: Any rapid, unexplained pH change is a contamination alarm. Don't just assume your cells are having a great day—get that culture under a microscope immediately.
Beyond color, look for tiny, floating structures. In the early stages, this can be tricky. You might see small, whitish or grayish specks that are easy to write off as cell debris. But look closer. Unlike the irregular shapes of debris, early fungal growth often appears as small, fuzzy tufts or a very fine, web-like network just starting to form.
Moving to Microscopic Confirmation
Once your visual check raises suspicion, the microscope is where you get your confirmation. This step is non-negotiable. It’s how you’ll differentiate between the two main types of fungal culprits—molds and yeasts—and rule out other look-alikes.
Start with a low-power objective (10x) to get the lay of the land. Scan the entire well or a large area of the flask. You’re looking for anything that clearly isn’t one of your cells. Once you spot something suspicious, switch to a higher magnification (20x or 40x) for a detailed look.
Here’s what to look for to identify the two main types of fungal invaders:
- Molds: These are the classic invaders, appearing as long, branching filaments called hyphae. They form an interconnected network known as a mycelium that can quickly spiderweb across your culture. Think of it as a tiny, tangled root system choking out your cells. Common lab villains like Aspergillus present exactly this way.
- Yeasts: These guys are sneakier. They’re single-celled, usually round or oval-shaped, and can be similar in size to your cells. The dead giveaway is budding, where new daughter cells pinch off from the parent. They often show up in clusters or chains. Candida species are the frequent offenders here.
Let's walk through a real-world scenario. You notice your media is a bit hazy, but the pH looks fine, so you initially rule out a raging bacterial infection. Under the scope, you see small, round particles mixed in with your cells. Your first thought might be "just a lot of dead cells." But as you scan, you notice some of those round particles have smaller orbs attached—they're actively budding. That’s a classic yeast contamination, which you might have missed if you only relied on pH changes.
Distinguishing Fungi from Other Artifacts
It’s easy to have a "panic moment" over something harmless. Not every floating speck spells doom. Developing a trained eye to tell the difference is a skill built from experience.
Here’s a quick guide to help you sort out what you’re seeing:
| Observation | Likely Identity | Key Differentiating Features |
|---|---|---|
| Branching filaments, web-like | Mold Contamination | Uniform thickness, distinct branching, spreads and grows over 24-48 hours. |
| Small, round or oval budding cells | Yeast Contamination | Obvious budding structures, often in clumps, very uniform in shape and size. |
| Tiny, shimmering, motile dots | Bacterial Contamination | Frantic, random movement; media clouds up very quickly (often overnight). |
| Irregular, non-moving shapes | Cellular Debris | Varies wildly in size and shape, doesn't grow or change appearance over time. |
| Crystalline, geometric structures | Media Precipitates | Sharp, angular edges; often disappear if you gently warm the media. |
When in doubt, play it safe. Isolate the suspicious flask or plate and keep a close eye on it for the next 24-48 hours. A true fungal contamination will always get visibly worse. Cellular debris and precipitates will not. This careful, methodical approach is the foundation of getting contamination under control before it takes over your entire lab.
Containing and Eradicating a Fungal Outbreak
The moment you confirm a fungal contamination, the clock starts ticking. Your immediate actions will determine whether this is a contained incident or a lab-wide catastrophe. This isn't the time for hesitation—it's time for a swift, methodical response to isolate the problem, eliminate it completely, and make a tough call on your cultures.
The first move, without question, is quarantine. As soon as you spot fungus in a flask or plate, it needs to be physically isolated. Get all affected materials—the cultures themselves, plus any media bottles or reagents that touched them—out of your main cell culture suite and into a designated “dirty” area. This one step is your best defense against spores spreading to clean cultures.
In the heat of the moment, a clear decision-making process is your best friend. This flowchart breaks down the key checkpoints, guiding you on what to do next based on what you’re seeing.
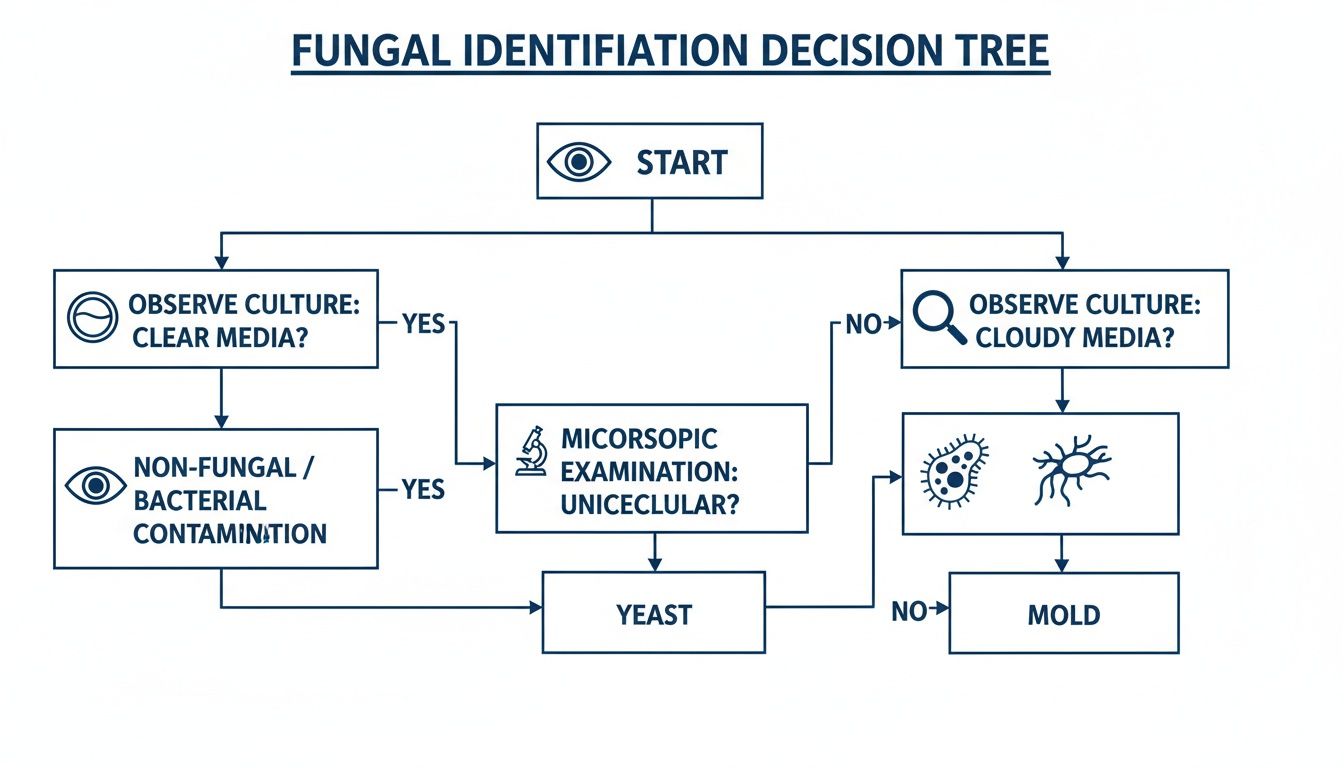
As the guide shows, you need both your eyes and your microscope to figure out what you're dealing with and how to respond.
Decontaminating Your Workspace
With the contaminated items isolated, your focus must immediately shift to the environment they left behind. Fungal spores are incredibly light and can easily go airborne, settling on surfaces you’d never suspect. A thorough decontamination of your biosafety cabinet (BSC) and incubator isn't just recommended; it's non-negotiable.
Start by clearing everything out of the BSC and incubator. Inside the cabinet, you’ll need a two-step cleaning protocol. First, wipe down every interior surface, including the sash and grilles, with 70% ethanol. This gets rid of any loose debris and provides a first pass of disinfection.
Next, follow up with a 10% bleach solution (that’s a 1:10 dilution of standard household bleach). Bleach is a potent sporicidal agent and is infinitely more effective against resilient fungal spores than ethanol alone. Let it sit for at least 10 minutes before wiping everything down again with sterile, endotoxin-controlled water to remove the corrosive bleach residue.
Your incubator demands the same rigorous cleaning. Pull out all the racks and shelves—autoclave them if you can—and meticulously scrub the incubator's interior with the same ethanol-then-bleach routine. Pay special attention to the water pan; it’s a notorious breeding ground for all sorts of nasty bugs.
Pro Tip: After a confirmed fungal event, I strongly recommend a full "deep clean" of the entire tissue culture room. That means floors, benchtops, and even equipment that wasn't directly involved. Spores travel. Being overly cautious now will save you from a repeat outbreak down the line.
The Salvage vs. Discard Decision
Now comes the hard part: deciding the fate of the contaminated culture itself. For most standard, workhorse cell lines, the answer is simple and brutal: discard them. The risk of cross-contamination and the sheer amount of time you’ll sink into a rescue attempt just aren't worth it. Autoclave every contaminated flask and plate before disposal to ensure the fungus is 100% neutralized.
But we all know some cultures are irreplaceable. Maybe it’s primary cells from a one-of-a-kind patient sample, a stable cell line that took six months to generate, or cells from a rare animal model. In these high-stakes situations, a salvage operation might be your only real choice.
Before you go down that road, be crystal clear about the risks. Even if a culture appears "cured," cryptic spores can linger, and the antifungal drugs themselves can alter cell physiology, potentially throwing off your experimental results. If you absolutely must try, you’ll need a strict quarantine and treatment protocol.
Implementing a Rescue Protocol
If you’ve decided a rescue is necessary, prepare for an intensive process. The goal isn’t just to kill the active fungus but to obliterate every last spore. This requires a dedicated incubator for the quarantined culture, and all work must be done at the very end of the day to minimize any risk to other clean cultures in the lab.
The treatment itself involves adding specific antifungal agents, like Amphotericin B or Nystatin, directly to the culture medium. It's critical to first run a dose-response test on a small aliquot of your cells to find the highest concentration of the antifungal they can tolerate without excessive toxicity.
A highly effective protocol involves treating the cells with an antifungal concentration just below their toxicity threshold. You'll then passage the cells two or three times in this treatment media. The most important step comes next: an extended culture period of four to six passages without any antibiotics or antifungals. This is the only way to confirm the cell culture fungal contamination has been truly eradicated. You can find more details on this kind of robust troubleshooting on Sigma-Aldrich's technical portal, which provides the kind of expert support that aligns with our philosophy at PurMa Biologics for tackling complex tissue culture challenges.
Building a Fortress Around Your Cultures with Proactive Prevention
Knowing how to react to an outbreak is a necessary evil, but the real goal is to never have to. The best way to beat cell culture fungal contamination isn’t with a decontamination protocol; it’s by making your lab an impenetrable fortress in the first place.
This means shifting your entire mindset from reacting to problems to proactively preventing them. It’s about building a system where every single action is designed to maintain a pristine environment. Your defense is built on three pillars: ironclad aseptic technique, rigorous environmental control, and uncompromising reagent quality. Turn these into habits, and you’ll create a workspace that fungi can't breach.
Master Your Aseptic Technique
The overwhelming majority of fungal contaminations—especially from mold and yeast—happen because of a small, almost unnoticeable lapse in aseptic technique. Spores are everywhere. They're in the air you breathe. Your technique inside the biosafety cabinet (BSC) is your first and most powerful line of defense.
The whole point is to preserve the sterile laminar airflow. Don't make quick, sweeping arm movements that cause turbulence; you’re just pulling contaminated room air right into your sterile field. Be methodical. Organize your hood with sterile items on one side, your culture in the middle, and waste on the other.
A few simple habits can change everything:
- Spray It All: Before anything enters the BSC, douse it with 70% ethanol and wipe it down. This goes for media bottles, pipette boxes, and your gloved hands. No exceptions.
- No Splashing: When you’re pipetting, always dispense liquids against the side of the flask wall. Dropping liquid from a height creates aerosols, which are perfect little contamination vectors.
- Keep It Capped: Never, ever leave a flask or plate sitting open on the bench. Cap everything loosely inside the hood, and only take things out when they are securely sealed.
The biosafety cabinet is your sanctuary, not a magic box. Its effectiveness is directly tied to how you work within it. Every breach in proper technique is an open invitation for a fungal spore to land in your culture.
Building this fortress means integrating proven techniques to avoid contamination that have been battle-tested in other labs. Don't reinvent the wheel; adopt best practices to reinforce your defenses.
Maintain Strict Environmental Control
Your lab itself is the next line of defense. A clean room and well-maintained equipment are non-negotiable for preventing the background spore count from getting high enough to challenge even the best technique. This isn’t a one-time thing; it requires a consistent cleaning and maintenance schedule.
Your incubators are warm, humid, and basically a five-star resort for fungi. Clean them monthly, at a minimum. This means changing the water in the pan (always use sterile, endotoxin-free water) and wiping down every interior surface and rack with a lab-grade disinfectant.
But don't stop there. Look at the other common culprits:
- Water Baths: These are notorious contamination swamps. Use a commercial biocide in the water and give them a full clean-out every single week.
- HEPA Filters: The filters in your BSC are your lifeline. Make sure they are certified annually. This confirms they're actually working and delivering sterile air.
- General Cleanliness: Regularly mopping floors and wiping down benchtops with proper disinfectants lowers the total bioburden in the room, reducing the odds of a stray spore finding its way into your hood.
Think of it like securing a house. You can have the best locks, but if you leave the windows wide open, you’re still going to have a problem. A clean and controlled environment is the foundation that makes your aseptic technique truly effective.
Guarantee Reagent and Media Quality
The final pillar of your fortress is the quality of what you put into your cultures. Your technique can be flawless and your lab spotless, but if you start with contaminated media, you’ve already lost. With up to 33% of cell lines estimated to be affected by contamination, you can't afford to be complacent.
Always buy your media, serum, and supplements from reputable manufacturers who take quality control seriously. When a new shipment arrives, visually inspect every bottle for turbidity or weird coloring before it even gets near your culture suite. A five-second check can prevent a five-week disaster.
Make these quality control steps part of your routine:
- Aliquot Everything: As soon as you open a new bottle of fetal bovine serum (FBS) or a key supplement, aliquot it into smaller, single-use tubes. This simple step prevents you from contaminating the entire stock bottle with repeated use.
- Filter if You Make It: If you prepare any solutions or media in-house, sterile-filtering them through a 0.22 µm filter is absolutely mandatory. This is a non-negotiable step to remove any potential fungal or bacterial stowaways.
- Run a "Blank" Test: Before trusting a new batch of media, incubate a small, uninoculated aliquot for 48-72 hours. If it stays crystal clear, you can proceed with confidence.
By relentlessly focusing on these three areas—aseptic technique, environmental control, and reagent quality—you create a multi-layered defense that is incredibly hard to penetrate. This isn’t just about preventing outbreaks. It’s about building a culture of quality that protects your most valuable asset: your work.
Advanced Strategies for Stubborn Contamination Issues
So, you’ve deep-cleaned the hood, decontaminated the incubator, and reviewed your aseptic technique. Yet, a few weeks later, you spot the tell-tale fuzzy colonies again. It’s a frustrating cycle that almost every cell culture scientist has faced.
When a fungal problem just won’t go away, it’s a clear signal that you’re no longer dealing with a simple breach in technique. This is a different beast altogether. Stubborn, recurring outbreaks mean you have a hidden fungal reservoir somewhere in your lab, and it's time to go from technician to detective.
Hunting for Hidden Contamination Reservoirs
A persistent fungal problem is rarely a random event. It's an indicator that spores have established a stronghold in a place you’re not looking, seeding new contaminations week after week. The usual suspects—incubators and biosafety cabinets—are the obvious places to start, but for a truly stubborn issue, you have to look beyond the sterile field.
Think about these often-overlooked hotspots:
- Water Baths: Warm, wet, and often neglected, these are perfect breeding grounds. Without a biocide and weekly cleaning, a contaminated water bath can aerosolize millions of spores, circulating them throughout the entire lab.
- Liquid Nitrogen Dewars: The vapor phase of a liquid nitrogen tank is not sterile. Fungal spores can absolutely survive in that environment, cross-contaminating vials and turning your precious cell bank into a ticking time bomb.
- Lab Equipment: Anything that creates aerosols or is shared among lab members is a potential vector. Think centrifuge rotors, vacuum lines, and even shared pipette controllers. A single contaminated item can infect the whole lab's cultures.
- Personal Items: That lab coat you haven’t washed in a month? Your personal notebook? Your cell phone? All of these can act as vehicles, carrying spores from the outside world directly into your sterile workspace.
A recurring contamination event is rarely a coincidence. It's a signal that a hidden fungal reservoir exists somewhere in your lab. A systematic "search and destroy" mission targeting these overlooked areas is often the only way to break the cycle for good.
The Double-Edged Sword of Routine Antifungal Use
When you’re fighting a losing battle with fungus, it’s incredibly tempting to just add an antifungal agent like Amphotericin B to all your media as an "insurance policy." It feels like an easy fix, but this strategy is a dangerous crutch that can cause far more harm than good.
Using antifungals continuously is a major red flag. It’s not a solution; it's a way of masking a deeper problem with either your aseptic technique or your lab environment. If you need fungicides just to keep your cultures clean, it means spores are getting into your flasks constantly. You aren't preventing contamination, you're just killing the invaders after they've already breached the walls.
This practice creates two serious downstream problems. First, you risk promoting the development of resistant fungal strains, leaving you with a "super-fungus" that no standard treatment can touch. Second, antifungal agents aren't harmless to your cells. They can exert subtle cytotoxic effects, altering cell physiology, slowing growth, and potentially invalidating your experimental data. The cure can slowly become part of the problem.
Fungal Contamination Troubleshooting Guide
When you're dealing with a contamination that keeps coming back, a random, "try-anything" approach just leads to more frustration. You need a methodical plan. This troubleshooting guide walks through some of the most common and infuriating contamination scenarios we see in the field, helping you pinpoint the root cause.
Here’s a breakdown of what to look for and how to fix it.
| Common Problem | Potential Cause | Recommended Action |
|---|---|---|
| Contamination keeps recurring in one specific incubator. | The incubator's internal fan, water pan, or shelving is a hidden reservoir. Spores are circulating internally. | Perform a full "deep clean" of the incubator. Disassemble and autoclave all removable parts. Fill the water pan only with sterile, endotoxin-free water. |
| Only one person in the lab is getting contamination. | There's a subtle, repeatable flaw in that individual's aseptic technique. | Conduct a side-by-side observation of their entire workflow. Focus on airflow disruption, how they spray items, and movement within the hood. |
| The "rescue" antifungal treatment is killing my cells. | The antifungal concentration is too high for your specific cell type, causing cytotoxicity. | Run a dose-response curve to find the maximum tolerated concentration (MTC) for your cells. Always start treatment at a sub-toxic level. |
| A "cured" culture gets contaminated again after a few passages. | The initial treatment only suppressed the fungus, it didn't kill dormant spores that later germinated. | Re-treat the culture, but this time, extend the antibiotic-free recovery period to at least 4-6 passages. This gives any remaining spores time to reveal themselves. |
By methodically investigating these potential weak points instead of just reacting to the latest outbreak, you can finally identify and eliminate the source of the problem for good. True sterile culture isn't about constantly fighting fires—it's about building a fortress where they can't start in the first place.
Lab Contamination FAQs
Even with the best protocols, questions always pop up in the heat of the moment. Here are some of the most common and critical concerns we hear from researchers dealing with contamination, with direct answers to guide your next move.
Can I Trust a "Cured" Culture for Sensitive Experiments?
This is a critical question, and the short answer is no. While you might be able to salvage a culture with antifungal treatment, you’re playing with fire. A culture that looks cured can still harbor dormant spores, just waiting to re-emerge and torpedo your experiment weeks or months down the line.
Even more insidiously, the antifungal drugs themselves can be cytotoxic. They subtly alter cellular physiology, tweak gene expression, and change growth rates. For any high-stakes experiment—quantitative proteomics, RNA-seq, or any assay measuring subtle functional changes—using a salvaged culture is not worth the risk. You’re just introducing too many confounding variables.
The Bottom Line: For routine work like passaging or expanding a non-critical line, a salvaged culture might be acceptable after extensive validation. For any sensitive, quantitative, or publication-critical experiment, always thaw a fresh, clean vial from your master cell bank. Don't compromise your data.
How Often Should I Screen Cultures That Look Clean?
Out of sight absolutely does not mean out of mind. Cryptic fungal contamination can grow slowly, without causing obvious turbidity or pH shifts, while silently skewing your results for weeks. Proactive screening isn't just good practice; it's your only real defense against this invisible threat.
Your screening schedule should be tiered based on how critical the culture is:
- Master Cell Banks (MCBs): Test these rigorously the moment they are created and before you ever expand them into a working bank. This is a non-negotiable QC step.
- Working Cell Banks (WCBs): Screen these periodically, especially if they’re in continuous use for several months.
- Routine Cultures: A regular visual and microscopic check every time you handle them is the bare minimum. However, the second you notice any strange cell behavior or inconsistent results, an immediate, full contamination test is warranted.
What Is the Single Biggest Cause of Fungal Contamination?
After decades in cell culture, one cause stands head and shoulders above all others: minor, often unconscious, lapses in aseptic technique. It’s almost never a catastrophic failure like dropping a flask on the floor. It’s the small, fleeting mistakes that add up.
Think about it. A quick arm movement that disrupts the laminar airflow in the biosafety cabinet. Forgetting to meticulously spray down a media bottle with ethanol before placing it in the hood. Accidentally touching the tip of a serological pipette to a non-sterile surface for just a fraction of a second. These are the open doors that allow ubiquitous fungal spores to find their way into your culture.
Constant vigilance and a methodical, almost ritualistic workflow are the ultimate preventative measures.
At PurMa Biologics, we know that preventing contamination is the foundation of reliable science. With over 3,030 reagents, from endotoxin-controlled water to advanced mycoplasma detection kits, we provide the high-quality building blocks you need to protect your valuable cultures. Explore our full range of solutions at the PurMa Biologics official website to build a fortress around your research.