
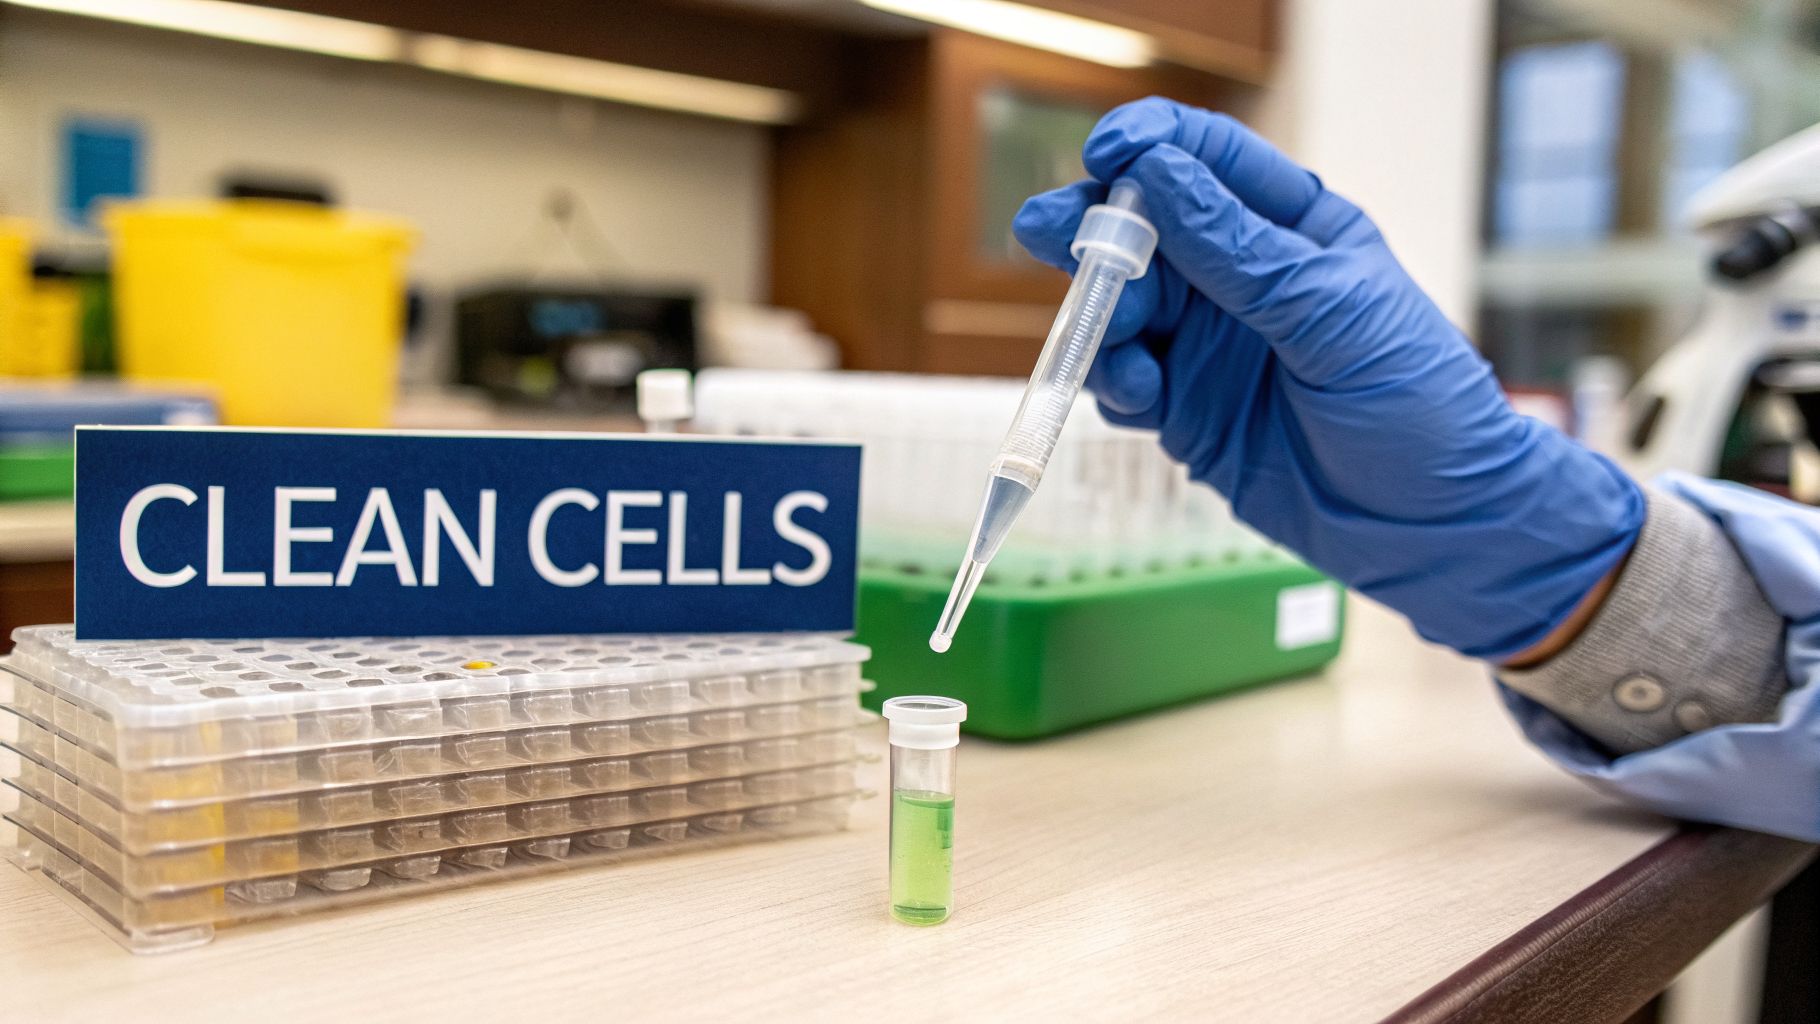
ACK (Ammonium-Chloride-Potassium) lysing buffer is built for a single, non-negotiable task in the lab: getting rid of red blood cells (RBCs). When you need a clean population of nucleated cells—like white blood cells—for your downstream work, this reagent is what gets you there. Its gentle but highly effective action is the first step toward reproducible, high-quality data.
The Science Behind a Clean Cell Pellet
At its heart, ACK lysing buffer leverages a simple biological reality: red blood cells are fragile. Lacking a complex cytoskeleton and robust membrane, they are far more susceptible to osmotic shock than nucleated cells like lymphocytes or monocytes. The buffer creates a hypotonic environment, causing water to flood into the RBCs until they swell and burst.
Meanwhile, the heartier leukocytes can withstand this osmotic pressure just long enough for you to stop the reaction, leaving them intact and viable. This clever, selective lysis is why ACK buffer is a staple in immunology, hematology, and cell biology labs everywhere. Without it, your target cells would be lost in a sea of red.
Why RBC Removal Is Not Optional
Imagine trying to isolate a few specific white blood cells from a sample where they are outnumbered up to 1000:1 by RBCs. That’s the reality of working with whole blood or spleen preps.
This overwhelming red cell contamination creates serious problems for common lab applications:
- Flow Cytometry: RBCs generate significant background noise, making it incredibly difficult to accurately gate and analyze your target leukocyte populations.
- Cell Sorting: A high concentration of RBCs can easily clog the delicate fluidics of a cell sorter, leading to instrument downtime, lost time, and worst of all, lost samples.
- Functional Assays: All that hemoglobin and other junk from lysed RBCs can dramatically alter the microenvironment, affecting the behavior of your cells in culture or functional studies.
The market for these reagents reflects just how essential they are. The global cell lysis market, which includes products like ACK lysing buffer, is on track to grow from USD 5.2 billion in 2026 to an estimated USD 9.57 billion by 2033. This growth is fueled by the relentless demand for reliable chemical lysis methods in proteomics and immunoassays, where a clean prep is everything. You can explore more data on the cell lysis market to see these trends firsthand.
In short, incomplete RBC removal isn't just a minor inconvenience—it's a direct threat to data integrity. A clean, white cell pellet is the first checkpoint for a successful experiment.
A Three-Part Chemical Team
The real power of ACK lysing buffer comes from the precise synergy of its three core components. Each one has a specific job to ensure you get a clean and viable cell population every time.
Here’s a quick rundown of what each chemical in the buffer does and why it’s there.
ACK Lysing Buffer Components and Their Functions
| Component | Chemical Formula | Primary Function in Buffer |
|---|---|---|
| Ammonium Chloride | NH₄Cl | This is the primary lytic agent. It diffuses across the cell membrane, creating the hypotonic stress that selectively bursts the fragile red blood cells. |
| Potassium Bicarbonate | KHCO₃ | This component acts as a pH buffer, maintaining the solution at a physiological pH (typically 7.2-7.4) to protect the target leukocytes from damage. |
| EDTA | C₁₀H₁₆N₂O₈ | As a chelating agent, EDTA binds divalent cations like calcium, preventing your target cells from clumping together after lysis. |
Together, these ingredients create a perfectly balanced environment—harsh enough for RBCs but gentle on your cells of interest.
This is why choosing a high-quality, pre-formulated ACK lysing buffer from a trusted supplier like PurMa Biologics is so critical. It guarantees these components are present in the exact concentrations needed for optimal, reproducible results, taking the guesswork out of one of your most important prep steps.
How to Prepare ACK Lysing Buffer in Your Lab
Making your own ACK lysing buffer is a rite of passage in many labs. It’s a straightforward way to save on costs compared to buying pre-made solutions. But don't let the simple recipe fool you—success here is all about precision. A tiny slip in concentration or pH can be the difference between a clean pellet of target cells and a failed experiment.
This guide lays out a reliable, lab-tested recipe for a 10X stock solution. Making a concentrated stock is a classic time-saver and, more importantly, it helps guarantee consistency from one experiment to the next.
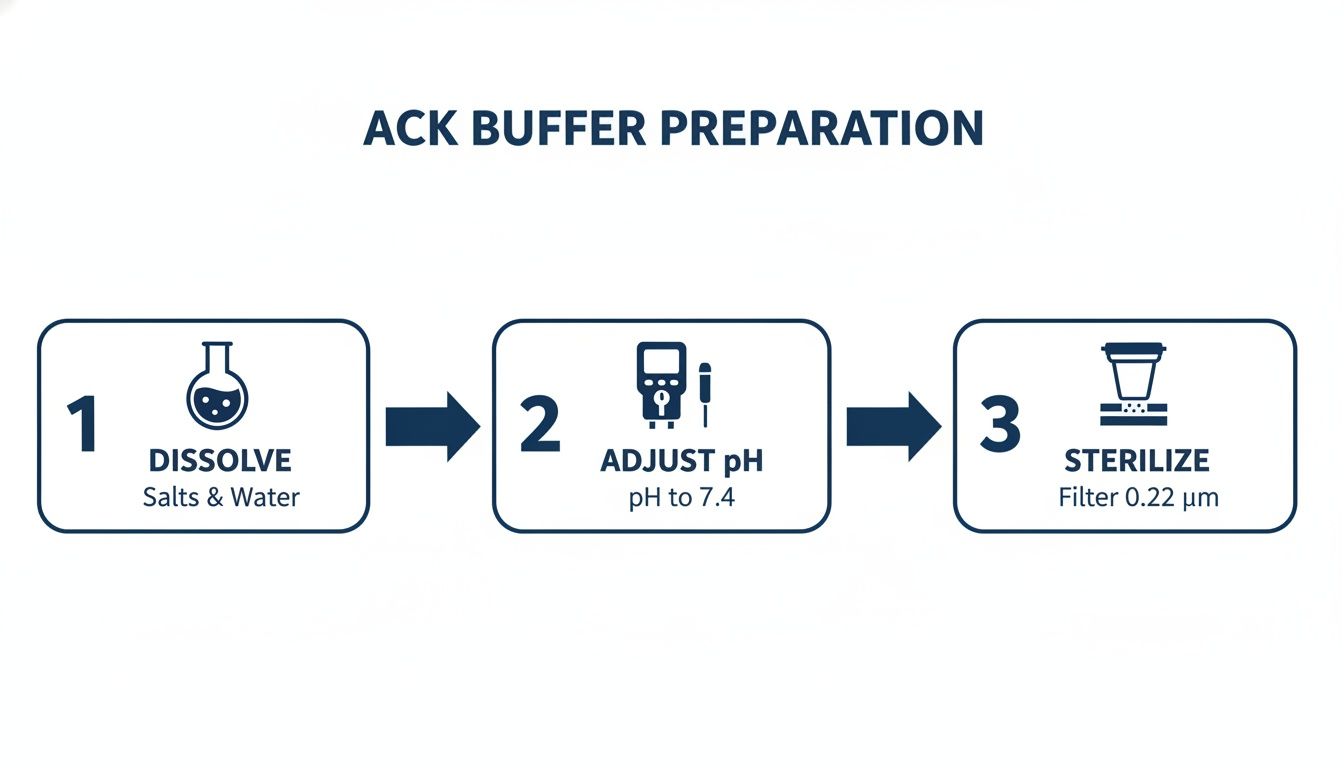
Crafting a 10X Stock Solution
Your first task is to accurately weigh and dissolve the three core components. To make one liter of 10X ACK lysing buffer, you’ll need to combine the following into about 800 mL of high-purity, endotoxin-free water.
- Ammonium Chloride (NH₄Cl): 80.2 grams
- Potassium Bicarbonate (KHCO₃): 10.0 grams
- EDTA (Disodium salt, dihydrate): 3.7 grams
Get this on a magnetic stir plate and let it mix thoroughly until every last solid has dissolved. This can take a while, so be patient. One thing that’s non-negotiable is using high-grade reagents from a supplier you trust. Impurities are just unwanted variables that can mess with cell viability.
Adjusting pH and Finalizing the Stock
Once everything is dissolved, you've reached the most critical step: adjusting the pH. The sweet spot for ACK is a narrow window between 7.2 and 7.4. Use a properly calibrated pH meter and carefully add drops of 1M HCl or 1M NaOH to dial it in.
Pro Tip: A pH outside this range is trouble. Too acidic, and you risk damaging your leukocytes. Too basic, and you'll get incomplete red blood cell lysis. Don't eyeball this or skip it.
After nailing the pH, transfer the solution to a graduated cylinder and add high-purity water to bring the final volume to exactly one liter (1 L).
The final touch is sterilization. The best way to do this is by vacuum filtration through a 0.22 µm sterile filter unit. This pulls out any potential microbial hitchhikers without changing the buffer's chemistry, which is essential for keeping your cell cultures clean. Store your sterile 10X stock at 4°C.
Preparing Your 1X Working Solution
Always make your 1X working solution fresh from the stock on the day you need it. This ensures the buffer is working at peak efficacy. The dilution is a simple 1:10.
- To make 100 mL of 1X ACK lysing buffer: Combine 10 mL of your 10X stock with 90 mL of sterile, endotoxin-free water.
Mix it gently by inverting the tube a few times, and you're ready to go.
When handling any lab reagents, knowing and following local personal protective equipment requirements is fundamental to staying safe. While the DIY route gives you control and saves money, labs that need high-throughput capacity or operate under strict quality controls often find that commercially prepared buffers, like those from PurMa Biologics, are worth it. They eliminate the risk of batch-to-batch variability and save you precious time at the bench.
A Proven Protocol for Lysing RBCs in Whole Blood
Once your ACK buffer is ready to go, the next step is applying it in a way that’s both ruthlessly efficient against red blood cells and gentle on your precious target cells. What follows is the standard, battle-tested procedure for isolating leukocytes from whole blood samples.
This method works so well because it reliably gets rid of the contaminating RBCs while keeping your lymphocytes, monocytes, and other nucleated cells healthy and viable.
The whole game is about ratios. You need to add just enough ACK buffer to pop the fragile RBCs without giving your hardier target cells too much exposure. The most effective and widely used ratio is 10 parts ACK lysis buffer to one part whole blood. So, if you're working with a 1 mL blood sample, you'll be adding 10 mL of 1X ACK buffer. This ensures the lysis is fast and complete.
Before you even touch a blood sample, make sure your buffer is prepared perfectly. These are the non-negotiable checkpoints.
Skipping any of these steps—failing to dissolve the salts completely, getting the pH wrong, or forgetting to sterile filter—is a recipe for inconsistent lysis or, even worse, sample contamination.
Executing the Lysis Step
With your sample and buffer prepped, it's time for the critical incubation phase. After adding the ACK buffer, give the tube a gentle vortex or a few inversions to mix everything thoroughly, then start your timer.
How long you incubate and at what temperature are the two variables that will make or break your prep.
- Incubation Time: The sweet spot is 3-5 minutes. Any shorter and you risk incomplete lysis (leaving you with a pink or reddish pellet). Go any longer, and you start damaging your target leukocytes.
- Incubation Temperature: Room temperature is the standard and is often gentler on cells. Some labs prefer to pre-chill their buffer and incubate on ice, especially for very sensitive cell types. This slows the reaction down, but you may need to extend the incubation time slightly to compensate.
Always have a timer going. The window for perfect lysis is tight, and being consistent here is absolutely essential for getting reproducible results, sample after sample.
Quenching and Cell Recovery
As soon as that timer goes off, you need to stop the reaction cold to save your cells. This is called "quenching." The fastest way to do this is by adding a large volume of a quenching buffer, which is usually a complete culture medium like RPMI-1640 with FBS or a simple balanced salt solution like PBS.
The proteins and isotonic environment immediately stop the hypotonic shock. A good rule of thumb is to fill the conical tube nearly to the top (for instance, to the 40 or 50 mL mark on a 50 mL tube).
Next, pellet your leukocytes by spinning them down. A standard centrifugation at 300-400 x g for 5-10 minutes at 4°C works perfectly. This is just enough force to pellet the cells without causing unnecessary stress or damage.
Expert Tip: Be extra careful when aspirating the supernatant after the spin. Your leukocyte pellet will be small and can be quite loose. Tilt the tube and use a fine-tipped pipette to draw off the liquid without sucking up your cells. If your pellet still has a reddish tint, a second, much shorter wash with ACK buffer (just 1-2 minutes) will usually clean it up.
The constant need for these kinds of reagents in the lab speaks to their central role in research. In fact, consumables like the detergents and enzymes found in lysis buffers accounted for over 60% of the cell lysis market in 2020, an enormous figure driven by their widespread use in everything from protein purification to cell-based assays. This trend is bolstered by significant government funding, which just goes to show how fundamental these basic lab protocols are to scientific progress. You can read more about these market dynamics and see the numbers for yourself.
Maximizing Viability and Purity
Finally, resuspend your clean, white cell pellet in whatever buffer or media you need for your downstream application, whether it's cell counting, flow cytometry, or setting up a new culture. Use a gentle pipetting motion to break up the pellet; never use a harsh vortex, as the shear stress can kill your cells.
A quick viability check using trypan blue exclusion is always a smart final QC step. A well-executed ACK lysis should give you a cell population with >95% viability. When done with care, this simple protocol gives you a reliable, clean, and healthy starting population for countless downstream assays.
Adapting Your ACK Lysis Protocol for Different Tissues
ACK lysis buffer is the go-to for cleaning up whole blood samples, but its utility doesn't stop there. If you're working with solid tissues like the spleen, lymph nodes, or bone marrow, you're facing the same fundamental problem: an overwhelming amount of red blood cells that can completely obscure your results.
The core principle of selective lysis is identical, but your protocol needs some smart adjustments to work on cells you've just liberated from a complex tissue environment.
The very first hurdle, which doesn't apply to a vial of blood, is creating a uniform single-cell suspension from your solid tissue. This is non-negotiable. If you don't do this, clumps of tissue will physically trap RBCs, leading to incomplete lysis and a frustratingly red pellet that refuses to go away.
Creating a Single-Cell Suspension
How you break down the tissue depends entirely on what you're working with. For most immunological tissues, there are two main ways to get individual cells free from the extracellular matrix.
- Mechanical Digestion: This is your first line of attack for softer tissues. Gently mashing a spleen or lymph node through a 40-70 µm cell strainer using a syringe plunger is often all you need. It’s a simple but incredibly effective way to physically disrupt the tissue architecture and release the cells.
- Enzymatic Digestion: For tougher, more fibrous tissues, you'll need to bring in enzymes to do the heavy lifting. A cocktail of enzymes like collagenase and dispase can gently dissolve the matrix holding everything together, turning the tissue into a slurry that you can then pass through a strainer.
No matter which route you take, the goal is a smooth, clump-free suspension. Once you have that, spin it down to get your cell pellet, and you're ready for lysis.
Adjusting Your Lysis for Solid Tissues
Once you have that single-cell pellet, the ACK lysis protocol will feel familiar, but a few key details change. The sheer cell density you get from a digested mouse spleen, for example, is worlds apart from what you see in a blood sample.
Key Consideration: The most common mistake is treating all pellets the same. You absolutely must adjust your buffer volume and incubation time based on the size of your cell pellet, not the weight of the original tissue.
For a large, dense pellet from a spleen or bone marrow sample, you're going to need more ack lysing buffer. Forget a strict 1:10 ratio. The practical approach is to add enough buffer to fully and easily resuspend the entire pellet—this often means 5-10 mL for a pellet from a single mouse spleen.
Your incubation time might need some fine-tuning as well. A 3-5 minute incubation at room temperature is a great starting point, but you need to watch the reaction. If you see the opaque red suspension clarify to a more translucent state quickly, you can move on to the quenching step. Being adaptable here is crucial for preserving the viability of your target cells.
The push for better cell-based disease models has fueled demand for reliable reagents. The global cell lysis and disruption market is projected to hit USD 6.78 billion in 2026, driven by major growth in biopharma R&D. Chemical lysis methods are often preferred for their consistency and scalability—two things that are vital for getting reproducible data in organ function studies. You can discover more insights about the cell lysis market on Precedence Research.
This same adaptability applies in unexpected situations, too. Imagine an RBC-rich cell population accidentally contaminates one of your precious co-cultures. A quick, gentle wash with ACK buffer can selectively eliminate the red cells and save the entire experiment. This kind of versatility is what makes ACK lysing buffer an indispensable tool in almost any lab working with mammalian cells.
Even the most routine lab protocols can throw you a curveball. You’ve followed every step, but you pull your tube from the centrifuge and see the dreaded result: a pinkish or stubbornly red cell pellet instead of the clean, white dot you expected.
Or maybe the pellet looks perfect, but a quick viability check shows your target cells are in bad shape.
When your ACK lysis protocol goes wrong, it's not just a minor setback; it's a roadblock that can compromise your entire downstream experiment. The good news is that most issues stem from a handful of common, fixable problems. By systematically checking a few key variables, you can diagnose the issue and get your experiment back on track.
When Lysis is Incomplete (The Dreaded Red Pellet)
A reddish pellet is the most obvious sign of trouble. It screams that your ACK lysing buffer didn't manage to remove all the red blood cells. Before you just repeat the experiment and hope for the best, let's break down the most likely culprits.
The problem almost always comes down to the balance between the buffer and the sample. An incorrect ratio is the most frequent cause of failure. If you use too little buffer for the number of red blood cells present, you simply overwhelm its lytic capacity. This happens a lot when working with large blood volumes or dense cell pellets from tissues like the spleen.
The incubation step is another critical window. If your incubation time is too short—less than three minutes, for instance—the buffer just won't have enough time to do its job. Don’t rush this step.
Finally, the health of your buffer itself is paramount. An old or improperly prepared buffer with a pH outside the optimal 7.2-7.4 range will be significantly less effective.
So, how do you fix it?
- Check Your Ratio: For a very large or dense cell pellet, don't be afraid to increase the volume of 1X ACK buffer you add. The key is to ensure the pellet can be fully and easily resuspended.
- Extend Incubation: Try pushing the lysis time to a full five minutes at room temperature. Make sure you’re giving the tube a gentle mix during this period to keep everything in suspension.
- Question Your Buffer: If you made the buffer yourself, confirm the pH with a calibrated meter. If it's a commercial buffer, check the expiration date. When in doubt, just make or open a fresh batch.
When Leukocyte Viability Is Low
Sometimes the pellet looks pristine and white, but a viability stain tells a different, more grim story. If your cell viability has plummeted below the acceptable 90-95% range, it means the lysis process was too harsh on your target leukocytes.
This issue almost always comes down to overexposure. Leaving your cells in the hypotonic ACK buffer for too long is the number one cause of damage. Even an extra minute or two beyond the recommended window can start to compromise the membranes of your more sensitive target cells.
Another factor can be how you physically handle the cells. Overly aggressive pipetting or vortexing during resuspension can inflict serious mechanical stress, leading to cell death that gets incorrectly blamed on the buffer.
Expert Insight: Remember that the quenching step is just as important as the lysis itself. Halting the reaction decisively with a large volume of isotonic media or buffer is absolutely crucial for protecting your cells from prolonged osmotic stress.
When Your Cells Start Clumping
Cell clumping is another frustrating outcome that can destroy accurate cell counting and clog up a flow cytometer in seconds. This usually points to one of two things: either the EDTA in your buffer isn’t doing its job, or dying cells are releasing their DNA.
When a significant number of cells die—from rough handling or over-incubation—they can release their DNA, which acts like a sticky net, trapping other cells and forming those visible clumps.
To resolve clumping:
- Work Gently: Always resuspend your cell pellets by gently pipetting up and down. Avoid any harsh physical agitation like vortexing.
- Bring in DNase: If clumping persists, try adding a small amount of DNase I to your wash buffer. This enzyme will chew up the free-floating DNA without harming your intact cells.
- Check Your EDTA: If you're using a homemade buffer, confirm your EDTA stock was correctly prepared and hasn't expired. Its chelating activity is essential for preventing cation-dependent cell adhesion.
For at-a-glance help, this table breaks down the most common issues you'll encounter and how to solve them.
ACK Lysis Troubleshooting Guide
| Problem Observed | Potential Cause | Recommended Solution |
|---|---|---|
| Pink or red cell pellet | 1. Insufficient ACK buffer volume for the number of RBCs. 2. Incubation time was too short. 3. Buffer is old, expired, or has an incorrect pH. |
1. Increase the buffer-to-pellet ratio (e.g., from 5 mL to 10 mL). 2. Extend incubation to a full 5 minutes at room temperature with gentle mixing. 3. Prepare a fresh batch of 1X ACK buffer and verify the pH is 7.2-7.4. |
| Low viability of target cells (<90%) | 1. Lysis incubation time was too long, damaging leukocytes. 2. Harsh mechanical handling (e.g., vortexing). 3. Quenching step was slow or inadequate. |
1. Reduce lysis time, sticking to the 3-5 minute window. 2. Resuspend the pellet by gently pipetting up and down. 3. Quench the reaction rapidly by adding a large volume (10-20X) of ice-cold media or PBS. |
| Visible cell clumping in the pellet | 1. DNA released from dead/dying cells. 2. Ineffective EDTA in the buffer. 3. Aggressive pipetting or centrifugation. |
1. Add DNase I (e.g., 10-20 U/mL) to your wash buffer. 2. Ensure your homemade buffer's EDTA is correctly prepared and not expired. 3. Handle cells gently at all times and use appropriate centrifuge speeds. |
Troubleshooting is a process of elimination. By starting with the most likely culprits—your buffer ratio, incubation time, and buffer quality—you can solve the vast majority of ACK lysis problems and ensure your downstream applications are built on a foundation of healthy, clean cells.
Answering Your Questions About ACK Lysing Buffer
Even the most straightforward protocol raises questions when you're standing at the bench. When it comes to using ACK lysing buffer, getting the small details right—from storage to safety—is what separates a clean, reliable cell prep from a frustrating afternoon of troubleshooting. Here are the clear, bench-level answers to the most common questions we hear.
How Should I Store ACK Lysing Buffer and What Is Its Shelf Life?
Proper storage is the easiest thing you can do to guarantee your buffer works the same way every time. The rules are a bit different for a concentrated stock versus your ready-to-use solution.
If you've made your own 10X stock solution, it belongs in the fridge. Kept tightly sealed at 4°C, it should be stable for several months. Before you use it, always give the bottle a quick look for any crystals that might have crashed out in the cold. If you see any, just warm the solution gently in a water bath until they’ve completely redissolved. Only then should you make your 1X dilution.
Your 1X working solution is another story entirely. It's far less stable, and its pH can drift over time, which will absolutely kill its lysis efficiency. The gold standard is simple: make it fresh from your 10X stock right before you start. If you have no other choice, you can store it at 4°C for up to a week, but fresh is always, always better.
This is one of the most compelling reasons to go with a commercially prepared buffer. Ready-to-use solutions from suppliers like PurMa Biologics have validated storage conditions and clear expiration dates, taking all the guesswork out of the equation. You never have to wonder if your buffer has gone bad.
Can ACK Lysis Damage My Target Leukocytes?
This is a crucial question, and the answer is a hard yes—if you don't stick to the protocol. The whole point of ACK lysis is its gentle selectivity, but that selectivity only works within a narrow time frame. For most tough leukocytes like lymphocytes and monocytes, a properly timed lysis of 3-5 minutes will have almost no effect on their viability or surface marker expression.
However, more fragile cells, especially granulocytes like neutrophils, can be much more sensitive to hypotonic shock. To protect your cells of interest, live by these rules:
- Don't Over-Incubate: This is the number one reason people lose cells. Set a timer and be ready to stop the reaction the second it goes off.
- Keep It at Room Temp: Lysis on ice sounds gentler, but for many cells, performing the step at room temperature is actually less harsh.
- Quench Hard and Wash Well: Stopping the reaction is non-negotiable. Hit it with a big volume of media or PBS to stop the lysis cold, then follow up with a wash to get rid of any lingering lytic agents.
If you’re working with an especially precious or delicate cell population, or if your downstream assay is super sensitive to cell stress, do yourself a favor: run a quick pilot experiment to dial in your ACK lysis protocol. It's time well spent.
Should I Buy a Pre-Made Buffer or Make It Myself?
The "DIY vs. buy" debate is a lab classic. The right call really comes down to what your lab prioritizes: cost, time, or absolute consistency.
Making Your Own ACK Lysis Buffer:
- The upside: It’s cheaper, no question. If your lab burns through liters of the stuff, the cost savings add up.
- The downside: It’s a time sink. You have to weigh reagents, dissolve everything, meticulously pH the solution, and then sterile-filter it all.
- The risk: It introduces variability. Small differences in reagent purity, water quality, or pH meter calibration can create batch-to-batch inconsistencies that are a nightmare to troubleshoot later.
Buying a Commercial Buffer:
- The upside: You get guaranteed consistency. Every bottle is manufactured to the correct formulation and pH, eliminating a huge source of potential error.
- The other upside: It saves a ton of time. Your team can spend their energy on the actual experiment, not on basic reagent prep.
- The downside: The upfront cost per bottle is obviously higher than the raw ingredients.
For any lab where reproducibility is king—think GLP/GMP environments, long-term studies, or clinical work—the reliability you get from a commercially prepared buffer is almost always worth the investment.
What Safety Precautions Should I Take?
While ACK lysing buffer isn’t a highly hazardous chemical, you should still stick to standard lab safety rules. Always wear your PPE—lab coat, nitrile gloves, and safety glasses—when handling the buffer or its raw chemical components.
If you're making the buffer from powder, be careful not to inhale any dust. The final 1X liquid buffer can usually be disposed of down the drain with plenty of running water, but you must first check and follow your own institution's specific guidelines.
The real safety issue comes up after you’ve used the buffer. As soon as it touches a biological sample like whole blood, that liquid is now a biohazard. This waste has to be properly decontaminated—a final concentration of 10% bleach is a common method—before you dispose of it according to your facility’s biohazardous waste protocols.
Eliminate experimental variability and save valuable time at the bench with a reliable, ready-to-use solution. PurMa Biologics offers quality-controlled ACK Lysing Buffer and a complete portfolio of cell culture reagents designed for consistent, publication-ready results. Explore our products.