
When you walk into any cell culture lab, you'll see them everywhere: the 125 ml Erlenmeyer flask. It’s so common, so fundamental, that it’s easy to overlook. But this isn't just another piece of glass. It’s a precision-engineered tool at the very heart of reproducible cell culture.
Its iconic conical shape, with a wide, flat base and a narrow neck, isn’t an accident. It’s a design perfected over more than a century to solve three critical problems that every scientist faces.
Think of it as the unsung hero of your bench, silently ensuring your media mixes perfectly, your cells stay aerated, and airborne contaminants stay out.
Why This Flask Is a Cell Culture Staple
Let's break down why this specific design has become an indispensable workhorse in modern biotechnology and pharmaceutical research. The flask’s shape strikes a delicate, but crucial, balance.
Rock-Solid Stability: The wide, flat base is your insurance policy on an orbital shaker. It provides a sturdy, un-tippable foundation, even during the most vigorous agitation needed for suspension cultures. No more worrying about spills or lost experiments.
Perfect Mixing Dynamics: The conical body is all about fluid dynamics. It allows you to swirl liquids aggressively without anything splashing out. This motion creates a vortex that pulls oxygen down into the media, enhancing aeration while keeping nutrients evenly distributed.
A Built-In Contamination Shield: The narrow neck is simple but brilliant. It drastically limits the surface area exposed to the environment, making it much harder for stray microbes, dust, or other contaminants to find their way into your precious culture.
A Legacy of Scientific Precision
This flask’s design dates all the way back to the 1860s, when German chemist Emil Erlenmeyer first sketched out its conical shape. Since then, the 125 ml capacity has become one of the most ubiquitous sizes in the lab, especially for small-scale shake flask cultures.
Its value skyrocketed with the introduction of borosilicate glass. Suddenly, the flask wasn't just well-shaped; it was also incredibly durable, with superior resistance to thermal shock and chemical corrosion. This made it perfect for autoclaving and repeated use. You can dive deeper into its design history over at the Smithsonian.
Today, manufacturing standards like ASTM E1404 dictate everything from a consistent wall thickness to a reinforced, rounded top. This isn't just about looks—it’s about minimizing chipping and breakage from the routine bumps and knocks of daily lab work.
It’s amazing, really. A design from the Victorian era remains a cornerstone of 21st-century science. For any lab focused on high-quality, reproducible work, the 125 ml Erlenmeyer flask isn't just a container—it's a critical component for achieving reliable outcomes, experiment after experiment.
Understanding the Anatomy of Your Flask
To get consistent results, you have to know your tools inside and out. That 125 ml Erlenmeyer flask sitting on your bench isn't just a piece of glass—it’s an engineered environment. Every single curve, the thickness of the wall, and the width of the neck directly affects the outcome of your cell culture work.
The first thing to consider is the material. Most of the reusable flasks you'll find in a lab are made from borosilicate glass. This isn't your everyday window pane glass. It’s a special formulation with two critical properties: it can handle the intense temperature swings of an autoclave without shattering, and it's chemically inert, so it won’t leach strange things into your precious media.
The Engineering Behind the Shape
That classic conical shape isn't just for looks; it’s a brilliant piece of functional design. The wide, flat bottom gives it stability on the shaker platform, while the sloping sides and narrow neck are precisely calculated to optimize aeration and minimize the risk of contamination.
This is how each part of the flask’s design contributes to a stable, predictable environment for cell growth.
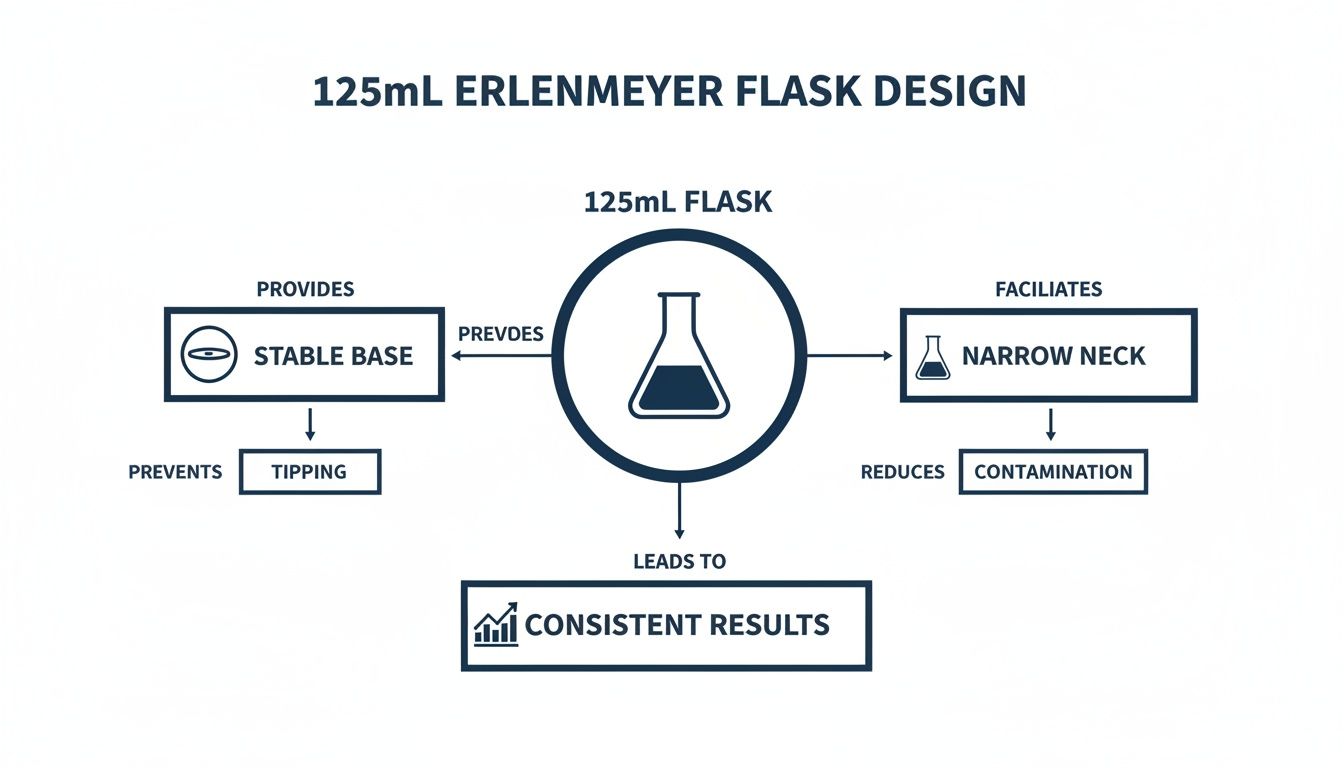
As the diagram shows, the stable base prevents tipping during agitation, while the narrow neck acts as a natural barrier against airborne contaminants. This isn't an accident; it's deliberate engineering for reproducibility.
These design choices are why one flask behaves just like the next, a non-negotiable factor for generating reliable data. But the standard flask is just the beginning.
Choosing the Right Flask Variant
Depending on what you’re growing, the standard 125 ml Erlenmeyer flask might not be the best tool for the job. Specialized variants exist to solve specific challenges you'll face in the lab.
The decision between a standard, baffled, or wide-mouth flask directly impacts aeration, shear stress, and even how easy it is to handle your cultures. Matching the flask to the cells’ needs is a fundamental step toward getting the results you want.
Let's break down the most common types you’ll encounter.
Standard vs. Specialized 125 mL Erlenmeyer Flasks
The choice here isn't arbitrary. Each flask type is optimized for a different kind of work, from gentle suspension cultures to high-demand microbial fermentations.
| Flask Type | Key Feature | Primary Application | Ideal For |
|---|---|---|---|
| Standard Flask | Smooth, conical interior walls | General-purpose mixing and cell culture | Routine suspension cultures, media prep, and storage where gentle agitation is sufficient. |
| Baffled Flask | Indentations or ridges on the inner walls | High-demand aerobic cultures | Microbial fermentation or high-density cultures requiring maximum oxygen transfer. |
| Wide-Mouth Flask | A significantly wider neck opening | Easy addition or removal of contents | Working with bulky solids, viscous liquids, or large-volume pipettes. |
For most mammalian cell lines, which are sensitive to shear stress, the gentle swirling action in a standard flask is exactly what you need. But if you’re working with bacteria or yeast that have a huge appetite for oxygen, the baffles are non-negotiable—they create the turbulence needed for maximum gas exchange and robust growth.
And if you’ve ever tried to dissolve a large amount of powdered media through a narrow opening, you immediately understand the value of a wide-mouth flask. Understanding these differences lets you pick the right tool from the start, setting your experiment up for success.
How to Determine the Right Working Volume
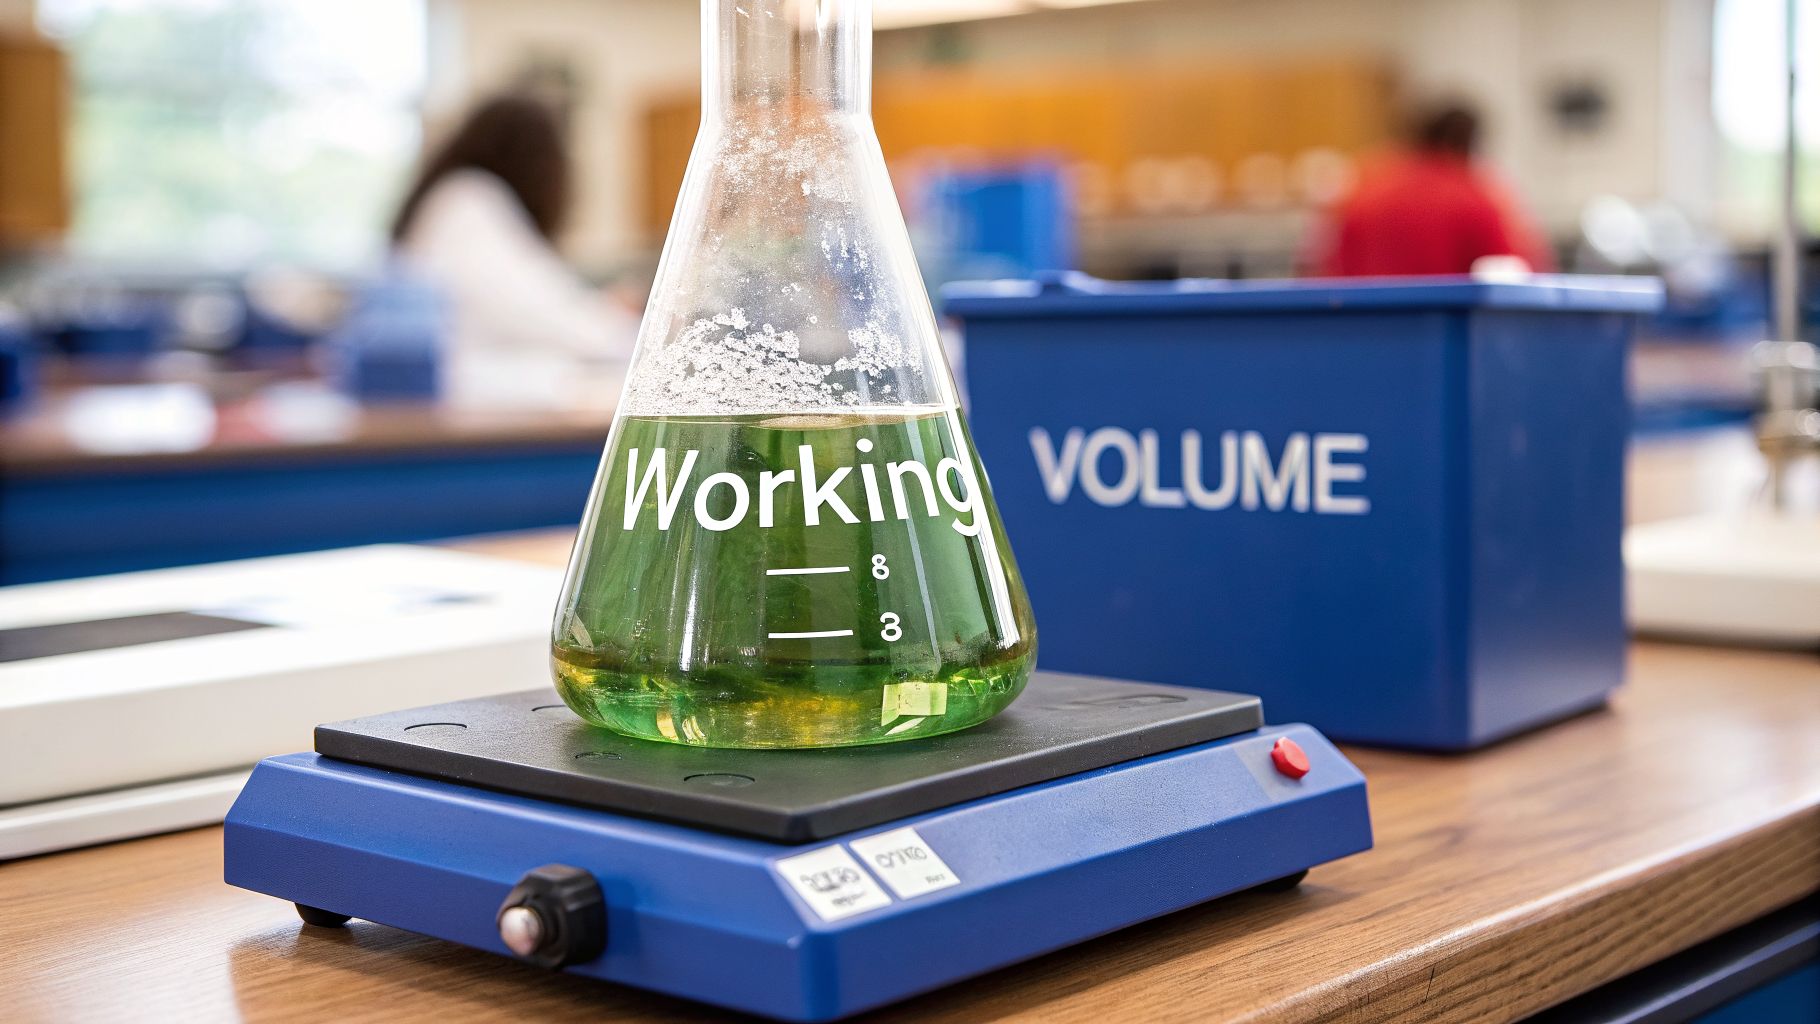
That “125 mL” stamped on the side of your flask? It’s a statement of total capacity, not a recommendation. For anyone working with cell culture, the single most important factor for success is the working volume—the actual amount of media you put inside. This one choice has a massive impact on aeration, nutrient mixing, and ultimately, the health and consistency of your cells.
Think of it this way: your cells need to breathe. The empty space above your media, the headspace, is their oxygen tank. As the flask swirls on the shaker, it constantly exposes a fresh liquid surface to that air, allowing oxygen to dissolve into the media. If you overfill the flask, you shrink the headspace and reduce the surface area for this critical gas exchange. You’re effectively suffocating your cells.
But underfilling a 125 ml erlenmeyer flask isn’t the answer, either. While it might seem like a great way to maximize aeration, it's an inefficient use of your media and incubator space. More importantly, it can create excessive splashing and shear stress that can damage or even kill your cells. Finding that "just right" volume is the key to getting reproducible results.
Finding the Aeration Sweet Spot
So, what’s the magic number? For most shake flask applications, the golden rule is to fill the flask to about 20-40% of its total nominal volume.
This simple guideline provides the ideal balance between the liquid media and the air in the headspace. It ensures you have a large enough surface area for efficient oxygen transfer while still providing enough media to support healthy cell growth for a reasonable amount of time.
- For a 125 mL flask: This translates to a working volume of 25 mL to 50 mL.
This range isn't just a random guess; it's a proven window for achieving healthy, reliable suspension cultures. Sticking to these volumes helps guarantee your cells get the oxygen they need without being subjected to the kind of extreme turbulence that could tear them apart.
Key Takeaway: Think of the working volume as the primary lever for controlling the environment inside your flask. Fill it too high, and you starve the cells of oxygen. Fill it too low, and you waste resources while risking mechanical stress. The 20-40% rule is your starting point for consistent, optimized results.
The Science Behind the Numbers
While that 20-40% fill is a fantastic rule of thumb for day-to-day lab work, the hard science of oxygen transfer reveals an interesting trade-off. Research has shown that for a 125 ml erlenmeyer flask, the absolute peak oxygen transfer rate actually occurs at even lower volumes, typically between 10% and 15% of the flask's total capacity. That would be a working volume of just 12.5 to 18.75 mL.
So why don't we all use that volume? Because most labs make a conscious trade-off between perfect aeration and practical cell yield. Operating closer to a 25% fill volume is often the sweet spot that maximizes cell density without severely compromising oxygenation. Pushing beyond that 25% not only hurts aerobic growth but also puts unnecessary mechanical strain on your orbital shakers.
Understanding this balance is what separates good science from great science. It allows you to make informed decisions to fine-tune your protocols for maximum consistency and success. You can see more on how these factors interact in this deep dive on shake flask culture.
The Art of Aseptic Technique: Sterilization and Maintenance

In cell culture, your results are only as good as your aseptic technique. Your 125 ml Erlenmeyer flask isn’t just a container; it's the first line of defense against the microbial world. This makes your cleaning and sterilization routine the single most critical factor in your experiment's success or failure.
Let's be clear: a tiny oversight here doesn't just introduce a variable. It can wipe out weeks of work. Thinking of maintenance as just "cleanup" is a rookie mistake. It's a core, non-negotiable part of your protocol.
Proper cleaning is far more than a quick rinse. It’s a deliberate process designed to obliterate every trace of old media, cellular debris, and chemical films that could sabotage your next culture. For borosilicate glass, this means a meticulous scrub with a lab-grade detergent, followed by repeated rinses with purified water until absolutely no residue remains.
The Autoclave: Your Best Defense Against Contamination
Once your glass flasks are spotless, they have to be sterilized. The autoclave is the undisputed champion for this job, using pressurized steam to annihilate any and all microorganisms. A poorly run autoclave cycle is one of the most common, and most frustrating, sources of contamination. Don't let it be yours.
To guarantee true sterility, follow a validated protocol. No cutting corners.
- Prep for Pressure: Cover the flask’s mouth loosely with aluminum foil. If you're using screw caps, you must loosen them by at least one full turn. This allows pressure to equalize. A tight cap turns your flask into a potential glass bomb inside the autoclave.
- The Standard Cycle: Run the autoclave at 121°C (250°F) under 15 psi of pressure.
- Hold for Sterility: Maintain these conditions for a minimum of 20-30 minutes. Remember, a densely packed autoclave requires a longer cycle time to ensure heat penetrates every item.
- The Slow Cool-Down: Let the autoclave cool down and depressurize on its own schedule. Rushing this step and opening the door too soon will cause thermal shock, cracking your perfectly clean glassware.
Your Strategy for Sterility: Reusable vs. Disposable
While reusable glass flasks are a workhorse in most labs, pre-sterilized, single-use plastic flasks are a smart alternative. They are especially useful for high-throughput experiments or when you're working with irreplaceable, highly sensitive cultures. They come gamma-irradiated and are ready to use straight from the bag.
The decision between a reusable glass 125 ml Erlenmeyer flask and a disposable plastic one boils down to a trade-off between cost, convenience, and your specific application. When you need to eliminate cleaning as a variable entirely, the reliability of pre-sterilized disposables is hard to beat.
The closure you choose is just as important. For any serious or long-term culture, vented caps with a 0.2 µm filter are superior. They create a sterile barrier while still allowing the critical gas exchange your cells need to thrive.
Classic foam plugs? They're a legacy option. While fine for some less-demanding applications, they offer far less protection from airborne contaminants. If your experiment's success hinges on absolute sterility, the choice is clear.
How to Choose and Source Your Flasks
For lab managers and principal investigators, choosing the right 125 ml Erlenmeyer flask is about much more than just restocking a shelf. It’s a strategic choice that ripples through your entire lab, affecting everything from experimental consistency and long-term costs to the efficiency of your team's workflow.
Making the right call means looking past the sticker price. You have to weigh the material, the quality standards, and the specific demands of your lab’s day-to-day operations.
The first fork in the road is the choice between reusable borosilicate glass and single-use plastic. Glass flasks are the lab workhorse for a reason—they offer fantastic durability, are chemically inert, and can be autoclaved hundreds of times, making them a very cost-effective choice for many applications.
But there’s a hidden cost. The labor involved in washing, sterilizing, and quality-checking glassware adds up, especially in a high-throughput lab where time is a critical resource.
On the other hand, pre-sterilized, single-use plastic flasks offer incredible convenience and completely remove the risk of cross-contamination from a bad wash job. They are the go-to option for high-value experiments, GMP-regulated work, or any lab that simply can't spare the resources for meticulous glassware maintenance.
Balancing Cost with Quality
When you’re sourcing flasks, quality has to be the priority. A cheap flask that chips after a few uses or has inconsistent dimensions isn’t a bargain—it’s a hidden cost waiting to derail an experiment.
Look for manufacturers who stick to recognized standards like ASTM E1404 for their glass flasks. This specification is your guarantee of consistency in wall thickness, durability, and geometric precision—all factors that are absolutely fundamental for getting reproducible results.
This need for quality is shaping the entire market. The global Erlenmeyer flask market is growing fast, projected to hit USD 1.2 billion by 2033. Most of that growth is coming from the biotech and biomanufacturing fields, which depend on high-quality materials like advanced borosilicate glass for developing cell culture media and processes. You can dig into the expanding flask market data on Strategic Revenue Insights.
Brands like Pyrex have become the industry standard for a reason, often sold in cases of 12 or 48, which shows just how vital a reliable supply is.
For procurement managers, this means that while cost is a factor, consistency and availability are paramount. A slightly higher upfront cost for a quality-certified flask is a small price to pay for reliable, publication-ready data.
Finally, take a hard look at your lab’s consumption rate. For high-throughput labs, buying a 125 ml Erlenmeyer flask in bulk can lead to major cost savings and protect you from the supply chain hiccups that seem to be the new normal.
Building a relationship with a trusted supplier who gets what you do ensures you always have the right tools on hand, ready for the next critical experiment.
Troubleshooting Common Flask Issues
Even the most carefully planned experiment can hit a snag. When your cell cultures suddenly start misbehaving, your 125 ml Erlenmeyer flask and its setup are the first places you should look. Working through these issues methodically is the only way to get your process back on track and restore reproducibility.
Poor cell growth is the classic complaint. Before you start questioning your media or even the cell line itself, go back to the fundamentals. Is your working volume correct? For suspension cultures in this flask, you should be aiming for 25-50 mL. Fill it too high, and you'll starve the cells of oxygen. Too low, and the splashing can create excessive shear stress.
Next, check your shaker. Are the speed and orbital diameter set correctly? A good starting point is 120-150 RPM with a 25 mm orbit, but every cell line is different. Speeds that are too slow will cause clumping and poor aeration, while speeds that are too fast can literally tear sensitive cells apart.
Diagnosing and Resolving Common Problems
Foaming in the media is another common red flag. This usually points to one of two things: your agitation is too aggressive, or a specific component in your media is reacting badly to the shear force. Try backing off the shaker speed in small increments. Often, you can find a sweet spot where the foam disappears, but the cells still stay in suspension.
Then there’s the issue everyone dreads: contamination. If you even suspect a sterility breach, you need to review your entire workflow, piece by piece, right away.
Closure Integrity: Are you using vented caps with a 0.2 µm filter? Make absolutely certain that the filter membrane is not wet, because a wet filter completely blocks gas exchange. If you’re using foam plugs, your aseptic handling technique has to be perfect every time.
Autoclave Validation: When was the last time you validated your autoclave cycle for both time and temperature? A densely packed autoclave needs a longer cycle to guarantee that every single flask reaches sterilizing temperatures.
Shaker Balance: Check your shaker platform. An unbalanced load can cause flasks to vibrate erratically, which can be enough to compromise the seal on your cap and let contaminants creep in.
When you're facing down persistent problems with your cell culture process, applying the principles of Root Cause Analysis Engineering can be a game-changer for figuring out what’s really going wrong.
A final point that’s easy to miss is the flask itself. Older glass flasks accumulate micro-scratches over time. These tiny crevices are perfect hiding spots for chemical residues and microbes that can survive a standard cleaning cycle. If you have one specific flask that seems to be a magnet for recurring, unexplainable contamination, it might be time to retire it.
Frequently Asked Questions
Even the best protocols can't cover every situation that pops up in the lab. Here are some quick, practical answers to common questions about the 125 ml Erlenmeyer flask, designed to solve problems on the fly and keep your research on track.
What Is the Optimal Shaking Speed for a 125 mL Flask?
For most common mammalian suspension cultures, like CHO or HEK293 cells, a shaking speed between 120–150 RPM is a solid starting point. This assumes you're using a standard orbital shaker with a 25 mm orbit and a working volume of around 25-40 mL.
It's all about finding that sweet spot. You need enough agitation to get sufficient oxygen into the media and keep the cells from clumping together. But go too fast, and you’ll create excessive shear stress that can damage or kill your cells. Always keep a close eye on cell viability and growth to dial in the perfect speed for your specific cell line and media.
Can I Reuse Disposable Plastic 125 mL Flasks?
Absolutely not. Single-use plastic flasks are designed, manufactured, and sterilized to be used exactly once. Reusing them is a recipe for disaster.
When you try to wash and re-sterilize these plastics, you risk a whole cascade of problems. Chemicals can leach from the plastic matrix directly into your culture. Microscopic scratches form on the surface, creating perfect hiding spots for contaminants. The structural integrity of the flask itself can be compromised. For results you can trust and zero risk of cross-contamination, always grab a fresh disposable flask or use a properly cleaned borosilicate glass one.
What Is the Difference Between a Standard and Baffled Flask?
A standard flask has smooth, uninterrupted inner walls. When you put it on a shaker, it creates a gentle, swirling vortex in the center. This is ideal for most shear-sensitive mammalian suspension cultures that just need gentle mixing.
Baffled flasks are a different beast altogether. They have indentations or ridges—the baffles—molded into the inner walls. These are designed to break up that smooth, laminar flow and create turbulence. This dramatically increases the surface area for gas exchange, making baffled flasks non-negotiable for high-density microbial cultures like bacteria or yeast that have massive oxygen demands.
Should I Use a Vented Cap or a Foam Plug?
For any high-value or long-term mammalian culture, vented caps are the way to go. These caps are engineered with a 0.22 µm hydrophobic membrane filter. This design allows for sterile gas exchange while physically blocking any airborne microbes from getting in. It also helps cut down on media evaporation.
Foam plugs are the classic, lower-cost alternative, and they do allow for good gas exchange. The problem is, they offer no sterile barrier. If they get wet or aren't handled with perfect aseptic technique, they can easily become a source of contamination. When your cultures are sensitive and reproducibility is critical, the security of a vented cap is a worthwhile investment.
At PurMa Biologics, we understand that reliable results begin with high-quality tools and materials. Explore our extensive portfolio of cell culture media, reagents, and services designed to bring consistency and performance to your research. Visit https://www.purmabiologics.com to see how we can support your next breakthrough.