
Yeast is the contamination that gives you a false sense of security. It doesn't come in with a bang, turning your media a lurid yellow overnight like bacteria. No, yeast is far more insidious. It creeps in, quietly multiplying, often looking like nothing more than a bit of cellular debris until it’s far too late.
Recognizing The Hidden Threat Of Yeast Contamination
Spotting yeast early is one of the toughest games in cell culture. A fast-moving bacterial infection is obvious—it practically announces its arrival. Yeast, on the other hand, is the quiet saboteur in the corner of your incubator.
This slow, stealthy progression is what makes it so dangerous. For days, your culture might seem perfectly fine. The phenol red in your media stays a reassuring pinkish-red, and you carry on, business as usual. But look closer. Is the flask just a little… hazy? That subtle, growing turbidity is your first real clue that something is very wrong.
Differentiating Yeast From Debris And Bacteria
We've all been there. You look through the microscope and see small, roundish particles floating around. "Just some cellular debris," you tell yourself. It's a common, and costly, mistake.
Dead cells and debris can look a lot like the first yeast invaders. But if you're patient and know what to look for, the differences become obvious. Yeast cells are typically uniform, ovoid, or spherical shapes. Crank up the magnification, and you might spot the dead giveaway: budding. A smaller daughter cell will look like it's literally pinching off from the parent cell.
Yeast contamination is a rare but brutal challenge, especially during the warmer, more humid months when lab hygiene can get sloppy. While bacteria will crash your culture in 2-3 days, yeast moves at a more deliberate pace, often matching the growth rate of your mammalian cells. By day two or three, however, the haziness is undeniable. Under 100x-400x phase contrast, you'll see the ovoid invaders clearly. For a deeper dive, check out these guides on recognizing common cell culture contaminants.
To help you make the right call quickly, it’s crucial to know the early warning signs for the two most common culprits.
Yeast vs Bacterial Contamination Early Warning Signs
Here’s a quick comparison to help you tell the difference when you’re staring down the microscope, trying to decide whether to keep a culture or toss it.
| Indicator | Yeast Contamination | Bacterial Contamination |
|---|---|---|
| Media Clarity | Becomes slightly hazy or turbid over several days. | Becomes cloudy very quickly, often overnight. |
| pH Change (Color) | Minimal to no pH change in the early stages. | Rapid drop in pH, turning media yellow. |
| Microscopic View | Individual, ovoid, or spherical particles; budding may be visible. | Tiny, often motile rods or cocci in massive numbers. |
| Growth Rate | Relatively slow, can be mistaken for slow cell growth. | Extremely rapid, quickly overwhelms the culture. |
This table should be your go-to cheat sheet the moment you suspect a problem.
Key Takeaway: The lack of a rapid pH drop is a classic signature of yeast contamination. If your media looks cloudy but the color is stable, yeast should be your primary suspect.
Internalizing these subtle but critical differences is your first line of defense. It’s what allows you to move from suspicion to action before the contamination becomes a full-blown lab disaster, protecting your cells and your research. In this game, battlefield intelligence is everything.
How to Confirm a Suspected Yeast Outbreak
You see something… off. The media isn’t cloudy like a full-blown bacterial infection, but it doesn't look right either. This is the moment where suspicion meets a critical decision point. Guessing has no place in the lab; a wrong move could mean sacrificing a valuable culture for nothing or, far worse, allowing a yeast outbreak to silently colonize your entire incubator.
Fortunately, moving from suspicion to certainty is straightforward. You have a few reliable methods to get a definitive answer, starting with the tool that's already on your bench.
Mastering Microscopic Examination
Your first line of defense is always the microscope. It's fast, it's accessible, and it’s the quickest way to get a visual diagnosis. Just take a small aliquot of your culture medium, pop a drop onto a slide with a coverslip, and have a look.
Start your scan at a lower magnification, around 100x. This gives you the lay of the land. Against the backdrop of your mammalian cells, yeast will often pop out as small, bright, distinct individual particles. They are highly refractile, meaning they almost seem to shine.
Now, zoom in. At 400x, the picture becomes much clearer, and you can easily distinguish yeast from random cellular debris. You’re looking for a few tell-tale signs:
- Uniform Shape and Size: Yeast cells are typically ovoid or spherical and remarkably consistent in size.
- Budding Formations: This is the smoking gun. Seeing a smaller daughter cell pinching off from a larger parent cell is an unmistakable sign of active yeast replication.
- Lack of Motility: Unlike some motile bacteria, yeast cells don't swim. They might jiggle around due to Brownian motion, but they won't show any true directional movement.
In the global ecosystem of cell culture, the subtlety of yeast contamination—marked by turbid media but a minimal early pH shift—hides its production-threatening impact. While some classify yeasts as unicellular fungi ranging from a few to 40 µm, their budding appearance under phase contrast can mimic cellular structures, turning cultures milky without the immediate phenol red alert that signals bacterial issues. Routine checks at 100x-400x are essential for low-level detection, preventing cloudy endpoints that derail experiments. For labs relying on PurMa Biologics' extensive media formulations, these confirmation checks are crucial for maintaining workflow integrity from discovery to scale. You can explore more detailed insights about detecting yeast contamination in tissue culture on unclineberger.org.
Culture-Based Confirmation Methods
What if the microscope leaves you with some doubt? Or what if you're chasing a sneaky, low-level contamination that's hard to spot visually? Your next move is a culture-based test. The strategy here is simple: give any potential yeast the perfect environment to grow, and they'll reveal themselves in a big way.
The gold standard for this is plating a sample of your culture supernatant onto a specialized fungal medium. Sabouraud Dextrose Agar (SDA) is the universal go-to for this. Its low pH and high sugar content are heaven for fungi but inhibit the growth of most bacteria.
Simply streak a small volume of your cell culture medium onto an SDA plate and let it incubate at 25-30°C. Within 2-5 days, you'll have your answer. If you see those characteristic creamy, opaque, or white colonies popping up, the contamination is confirmed.
Pro-Tip: Don't just plate your suspect culture. Always plate a control sample of the base medium from the same bottle you used. This is a critical step to determine if the contamination is isolated to your culture or if you have a much bigger problem: a compromised reagent.
When to Use Advanced Detection Tools
For most day-to-day research, a scope and an agar plate are all you need to confirm a yeast outbreak. But in some situations—like a cGMP biomanufacturing facility or when you're hunting down a persistent, phantom-like contamination—you need absolute, unambiguous certainty.
This is where Polymerase Chain Reaction (PCR) assays come in. These are highly sensitive and specific tools that can sniff out even minute traces of fungal DNA. Commercial kits are designed to target conserved regions within the fungal genome, delivering a rapid and definitive yes-or-no answer.
While PCR is a more expensive route, its speed and accuracy are invaluable when critical production decisions hang in the balance. When you need to move from suspicion to confirmation with the highest degree of confidence, PCR is the way to go.
So, you've confirmed it. It's yeast. The moment you move from suspicion to certainty, the clock starts ticking. This isn't the time for hesitation. You need to shift from diagnosis to immediate, decisive action to stop a single contaminated flask from becoming a full-blown lab disaster.
Your battle plan is simple: first, aggressive containment to stop the spread. Then, a swift eradication of the fungus from your cultures and equipment.
This flowchart lays out the decision tree, starting from that sinking feeling you get when looking down the microscope to the definitive plate culture.
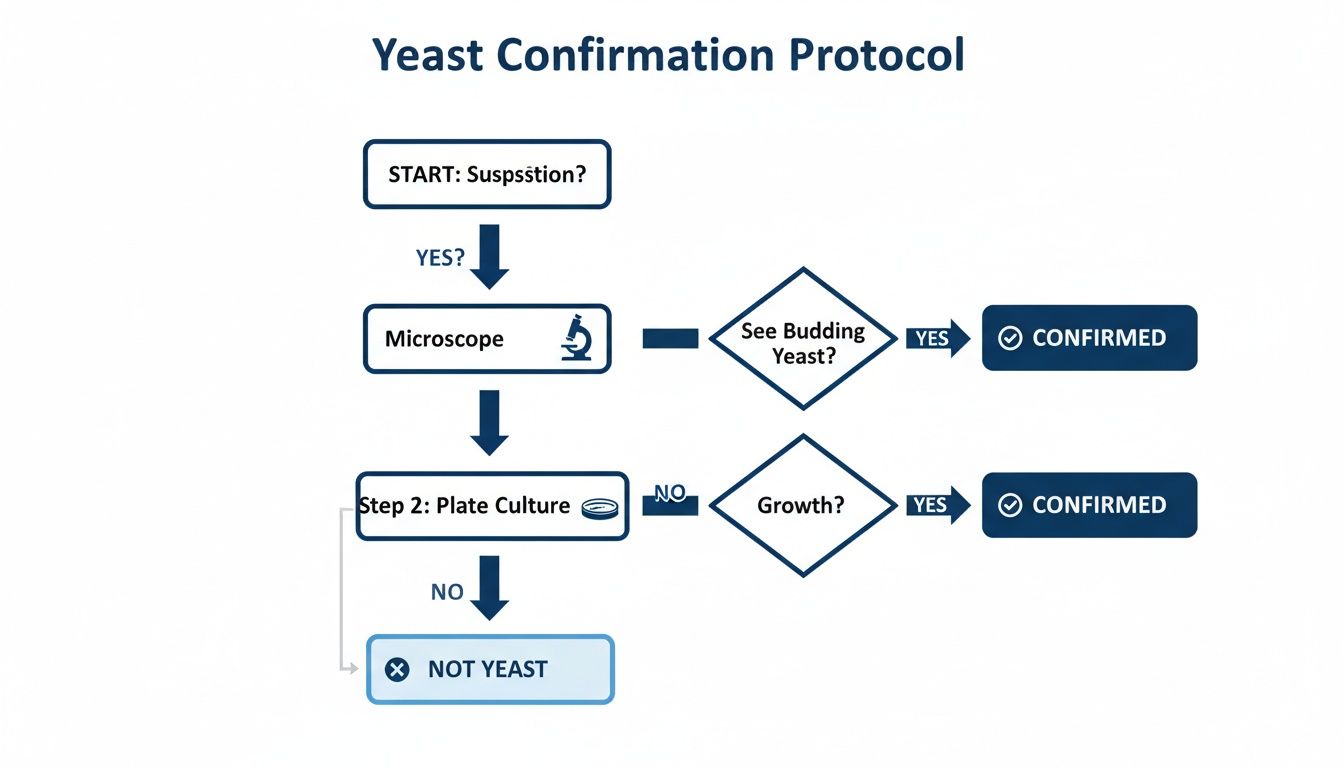
As you can see, seeing budding yeast under the scope is an open-and-shut case. But even if the scope looks clear, a plate test is non-negotiable to catch those low-level, stealthy infections before they take over.
Immediate Containment Protocols
The second you confirm yeast, containment is everything. Your one and only goal is to quarantine the problem. You have to prevent those microscopic fungi from hitching a ride to other flasks, fresh media, or any piece of shared equipment.
Start by isolating all suspect materials. And I don't just mean the flask where you first spotted the little ovals. Any culture that shared the incubator, touched the same bottle of media, or was handled in the same biosafety cabinet session is now guilty by association.
- Isolate Contaminated Flasks: Get all confirmed and suspected flasks out of general circulation. Move them to a dedicated "quarantine" incubator if you have one. If not, the lowest, most isolated shelf in your regular incubator will have to do—and label them with giant, unmissable "CONTAMINATED" signs.
- Segregate Reagents: That bottle of media or serum you used on the sick culture? It’s now compromised. Do not use it on anything else. Quarantine the entire bottle and label it clearly for testing or, more likely, disposal.
- Lock Down Shared Equipment: The pipettor you used, the aspirator line, the media warming bath—they are all now potential vectors. Set them aside immediately for a full decontamination.
Think of it like setting up a crime scene perimeter. Nothing gets in or out until the threat is neutralized. This kind of disciplined response is what separates a minor setback from a full-blown crisis that could cost you weeks or months of work.
Eradication: The Great Discard Debate
With your perimeter secure, you face a tough question: try to save the culture, or cut your losses? For yeast, the answer from almost any veteran of the tissue culture wars will be the same: discard the culture. It's the safest and most efficient path forward.
It’s tempting to try and rescue a precious cell line with antifungals, I get it. But it's a high-risk gamble. Antifungals like Amphotericin B are notoriously cytotoxic. They might kill the yeast, but they will absolutely hammer your cells in the process, causing stress and damage that can permanently alter their phenotype. Any data you get from those cells post-treatment is questionable at best.
Expert Insight: For any routine culture, the answer is always discard. No exceptions. If it’s a truly irreplaceable cell line, a rescue attempt is a desperate, last-ditch effort. If you absolutely must try, an antifungal like Fluconazole at 300 µg/mL is a place to start. Taper down to 150 µg/mL for a few passages after the yeast is gone, but stay vigilant for any signs of altered cell behavior.
The Critical Deep-Clean Procedure
Whether you discard the culture or attempt a heroic rescue, a full-scale deep clean of your entire workspace is non-negotiable. Yeast are survivors. Their spores are tough, resilient, and can linger on surfaces just waiting for a chance to ruin your next experiment. Your cleanup has to be absolute.
Start with the biosafety cabinet. Take everything out. Wipe every square inch of the interior—the sash, the back wall, and especially under the work surface—first with a surface disinfectant, then with 70% ethanol.
Next, the incubator. Pull out every shelf and support. Autoclave them if you can. Scrub the entire interior with a lab-grade disinfectant that’s rated for fungi. Give extra attention to the water pan, which is a notorious five-star resort for contaminants. Empty it, scrub it clean, and refill it with sterile, endotoxin-controlled water, maybe with a commercial anti-fungal tab thrown in for good measure.
Finally, decontaminate every piece of equipment that even looked at the contaminated culture. Aspirator flasks and tubing, pipette controllers, vortexes, you name it. This scorched-earth cleanup is your insurance policy against a recurring nightmare. It's what ensures the yeast contamination in cell culture you just dealt with is a one-time event, not the pilot episode of a long-running series.
Tracing the Source of a Contamination Event
Scrubbing your lab after a confirmed yeast contamination feels like a victory, but it's a hollow one. If you can’t figure out how the fungus snuck in, you're just resetting the clock on the next disaster. The cycle will repeat.
This is where you put on your detective hat. A root cause analysis isn't about pointing fingers. It's about turning a costly, frustrating crisis into a bulletproof defense for your lab's future. The goal is to systematically hunt down every possible entry point until you find the broken link in your chain of sterility. Question everything—your hands, your reagents, your air.
Reviewing the Timeline and Lab Notebooks
Your first move is to go to the records. A meticulously kept lab notebook is your best forensic tool. Start by creating a timeline. When was the contamination first spotted? Which specific cultures are fuzzy? Who handled them, and when?
Once you have a list of contaminated flasks, it's time to work backward. You're looking for the common thread.
- Shared Reagents: Did every contaminated culture touch the same bottle of media, serum, or trypsin? Make a list of every shared reagent. These are now your primary suspects.
- Technique and Timing: Was a single person handling all the affected flasks? Did the contamination pop up after a marathon late-night session, when exhaustion makes sloppy technique almost inevitable?
- Equipment Use: Were all the bad flasks handled in the same biosafety cabinet? Did they all live in the same incubator?
This isn't about blaming a person or a piece of equipment yet. It's about finding patterns to shrink your search area from "the entire lab" down to a few high-probability targets.
Investigating Reagents and Media
One of the most common culprits for yeast contamination in cell culture is a compromised reagent. If your timeline points to a shared bottle of media or FBS, it's time to put it on trial.
Don't just toss it. That's a rookie mistake. Take a sample of the suspect liquid and plate it directly onto a Sabouraud Dextrose Agar (SDA) plate. Give it a few days in the incubator. If you see those tell-tale yeast colonies bloom, you’ve found your smoking gun. This step is non-negotiable; it confirms the source and can save you from a supplier-related nightmare affecting multiple labs.
We know from industrial settings that microbes love nutrient-rich liquids, a situation that perfectly mirrors how yeast can overwhelm our mammalian cultures. And remember, yeast spores travel through the air, making humid spots like incubators prime real estate for an outbreak. With the FDA and ATCC estimating that 5-30% of all lab cultures are contaminated, the risk is ever-present. You can learn more about the parallels between industrial bioproduction and cell culture contamination risks on pmc.ncbi.nlm.nih.gov.
Practical Tip: Never use media or serum directly from the master bottle. When a new bottle comes in, immediately aliquot it into smaller, single-use volumes. This creates a firewall. If one aliquot gets contaminated, your master stock and the rest of your supply remain sterile and safe.
Auditing Aseptic Technique and Environment
If your reagents test clean, the investigation gets more personal. It's time to look at your team's technique and the lab environment itself. This can be a sensitive topic, so frame it as a collaborative effort to tighten up shop, not an inquisition.
Set up a peer-review system. Have lab members watch each other work in the hood. Is every surface being sprayed down with ethanol? Are arms being passed over open bottles? Is anyone talking or singing while handling open flasks? These tiny habits are the difference between clean cultures and a fungal jungle.
Finally, turn your attention to the environment itself. Yeast spores are everywhere in the air, just waiting for a nice, warm, damp place to land. Swab these key hotspots and culture them on SDA plates:
- Incubators: Get a swab from the water pan—this is the most common hideout. Also test the walls and shelves.
- Water Baths: Warm, stagnant water is a five-star resort for fungi.
- Biosafety Cabinets: Swab the entire work surface, paying special attention to the corners and the front grille where airflow can be tricky.
By methodically working through this checklist—records, reagents, technique, and surfaces—you stop being a victim of contamination. You become a problem-solver. And you will find the source.
Building Your Lab's Defense Against Future Contamination
The best offense is a good defense. After the stress of eradicating a yeast outbreak, your mission shifts from reactive cleanup to proactive prevention. Building a resilient defense system isn't about a single magic bullet; it’s about layering multiple, overlapping protocols that make your lab an inhospitable place for contaminants.
This approach goes far beyond just remembering to spray your gloves with ethanol. It means taking a hard, systematic look at your workflows, equipment maintenance, and how you handle materials. The goal is to choke off every possible entry point for yeast contamination in cell culture.
Mastering Workflow in the Biosafety Cabinet
Your biosafety cabinet (BSC) is the heart of your sterile work, but it’s only as good as your technique. Seemingly minor habits can create major vulnerabilities. Think of the inside of the hood as sacred ground—every movement matters.
Organize your workspace for a clean-to-dirty workflow. Simple, but critical. Place sterile items like fresh media and flasks on one side, and used items like waste containers on the other. This prevents you from ever passing a dirty item over a sterile one, a common and catastrophic error.
And please, don't overload the cabinet. Clutter disrupts the protective curtain of air, creating turbulence that can pull contaminated room air directly onto your work surface. Keep only the essential items you need for the immediate task inside the BSC. Everything else stays out.
Fortifying Your Equipment and Environment
Your lab equipment can either be part of your defense or a Trojan horse for contaminants. Regular, scheduled maintenance is non-negotiable, especially for the warm, humid environments that yeast finds so inviting.
The incubator is ground zero. Beyond just wiping down spills, a routine deep clean is essential. Water pans are notorious breeding grounds for fungi and should be emptied, scrubbed, and refilled with sterile water weekly. Adding a commercial anti-fungal agent to the pan is a smart, low-cost layer of extra protection.
Establishing a robust defense against contamination involves adhering to strict safety protocols. For a comprehensive look at relevant guidelines, consult resources on OSHA and biohazard cleanup compliance and safety standards. This knowledge helps ensure your cleaning procedures are both effective and safe for your team.
Pro-Tip: Don't forget your water bath. Its warm, stagnant water is a perfect incubator for fungi. Drain, clean, and refill it regularly with sterile water. Never use non-sterile tap water—it's one of the most common sources of yeast and other microbes.
A consistent schedule holds everyone accountable and turns good intentions into ingrained habits. Use this table as a starting point and adapt it to your lab's specific needs and traffic.
Recommended Lab Decontamination and Monitoring Schedule
| Equipment/Area | Recommended Frequency | Action/Method |
|---|---|---|
| Biosafety Cabinet | Daily (before/after use) & Weekly | Wipe all surfaces with 70% ethanol before and after each use. Perform a full wipe-down, including under the work surface, weekly. |
| CO₂ Incubator | Weekly & Monthly | Check and change water pan weekly. Perform a full interior cleaning monthly with a lab-grade disinfectant. |
| Water Bath | Weekly | Drain, scrub with disinfectant, and refill with sterile water. |
| Microscope Stage | Daily | Wipe with 70% ethanol after use, especially if viewing contaminated slides. |
| Pipettors | Monthly | Disassemble, clean, and autoclave according to manufacturer instructions. |
This schedule isn't just a checklist; it's a critical part of your lab's immune system.
Smart Materials and Reagent Management
Even with perfect technique and clean equipment, you can still be defeated by a single contaminated bottle of media. Your final line of defense is rigorous materials management.
Qualify New Reagents: When a new lot of serum or media arrives, don't just trust it. Test a sample on a non-critical, disposable culture first. Quarantine the new lot until you've confirmed it's clean.
Embrace Single-Use Aliquots: This is arguably the single most impactful change you can make. Never, ever work directly from a large stock bottle. The moment a new reagent arrives, aliquot it into smaller, sterile, single-use volumes. This creates a firewall; if one aliquot gets contaminated, the master stock and all other aliquots remain safe.
Label Everything Clearly: Every aliquot needs to be clearly labeled with the reagent name, concentration, lot number, and the date it was prepared. This practice is non-negotiable for troubleshooting if a contamination event does occur.
By implementing these multi-layered defenses, you create a robust system that protects your valuable research. It requires discipline and consistency, but the payoff—reliable, reproducible, and contamination-free results—is more than worth the effort.
Your Questions on Yeast in Cell Culture Answered
Even in the most meticulous labs, questions come up. You’re staring at a flask, squinting at those tiny floating specks, and the same thought races through your mind: is that just cell debris, or is this the start of a full-blown disaster?
This is where clear, practical answers matter most. We'll get into the common sticking points, from what to look for under the microscope to making the tough but necessary call on a full lab clean-out. This is your go-to guide for navigating those high-stress moments with confidence.
Can I Save a Culture Contaminated with Yeast?
This is always the first question, and my answer is almost always a hard no. It's tempting to try and salvage a culture with antifungal agents, but for any routine work, the risks are just too high.
Antifungals like Amphotericin B are notoriously toxic to mammalian cells. Even if you manage to wipe out the yeast, the treatment itself will have stressed your cells, potentially altering their gene expression, metabolism, and overall phenotype. Any data you generate from that "rescued" culture is scientifically compromised.
If you’re dealing with a truly irreplaceable cell line, a rescue attempt can be a last resort. Instead of the highly toxic Amphotericin B, try a less cytotoxic alternative. I’ve had some success starting with 300 µg/mL fluconazole until the yeast is visibly gone, then maintaining the culture on 150 µg/mL for another two to three passages to make sure it doesn't come roaring back.
What if I Only See a Few Yeast Cells?
Seeing just one or two yeast cells is like spotting a single cockroach in your kitchen—you have to assume there are hundreds more hiding in the walls. Yeast replicates by budding, and a single cell can explode into a full-blown infestation that starves your culture of nutrients.
There's no such thing as a "minor" contamination. The moment you confirm even a single yeast cell, treat it as a serious threat. Isolate that flask immediately, consider all shared reagents from that work session compromised, and start your containment protocol. Don't wait for the media to turn cloudy; by then, it has likely spread everywhere.
How Can I Tell if it's Yeast and Not Just Cell Debris?
This is a classic point of confusion, especially if you're new to cell culture. Under the microscope, both can look like small, floating particles. Here’s what to look for at 400x magnification to tell them apart:
- Shape: Cell debris is usually irregular and comes in all sorts of sizes. Yeast cells are strikingly uniform—they’re distinct ovoid or spherical shapes that are highly refractile, meaning they have a bright, almost shiny appearance.
- Budding: This is the dead giveaway. If you see a smaller cell pinching off from a larger "parent" cell, you have confirmed budding yeast. There's no ambiguity.
- Consistency: Scan multiple fields of view. If you consistently see particles of the same round shape and size, your suspicion should lean heavily toward yeast. Debris is random; contamination is uniform.
When in doubt, let a culture test give you the final word. Streak a sample of your media onto a Sabouraud Dextrose Agar (SDA) plate. Within a few days, if you see those creamy, opaque colonies pop up, you know you have a yeast contamination in cell culture.
At PurMa Biologics, we understand that reliable results depend on pristine cultures. From our wide range of sterile media and sera to mycoplasma detection kits and lab surface sanitizers, we provide the high-quality reagents you need to build a robust defense against contamination. Explore our solutions for contamination control.