
If you've spent any time in a protein biochemistry lab, you’ve definitely heard of His-tag protein purification. It's the workhorse technique for a reason—it transforms what could be a frustrating, multi-day purification slog into a surprisingly straightforward process.
This method is all about giving your protein a special "handle" that nothing else in the cell has, allowing you to pull it out of a complex cellular soup with remarkable ease.

Understanding the Power of His Tag Purification
At its core, this technique is a form of Immobilized Metal Affinity Chromatography (IMAC). By genetically engineering a short string of histidine residues (the "His-tag") onto your recombinant protein, you've given it a unique biochemical property: a strong affinity for certain metal ions.
Imagine you’ve just lysed your cells. Your target protein is now floating around in a complex mess of thousands of other proteins, DNA, and cellular junk. The His-tag is what allows you to specifically fish it out.
How the His Tag Interaction Works
The magic happens when the imidazole side chains of your protein's histidine tag form coordinate bonds with divalent metal ions, most commonly nickel (Ni²⁺) or cobalt (Co²⁺). These metal ions are chelated, or "immobilized," onto a solid support resin, usually made of agarose or magnetic beads.
When you pass your cell lysate over this resin, only your His-tagged protein sticks. Everything else—all those unwanted contaminants—just washes right through. It's an elegant and incredibly specific interaction.
Key Takeaway: The His-tag acts like a specific molecular magnet. It allows your protein to stick firmly to the chromatography resin, while hundreds of other contaminating proteins are easily washed away, dramatically simplifying the purification process.
This simple bind-wash-elute protocol is what makes His-tag purification so powerful. In a single chromatography step, you can often achieve the high purity standards required for downstream applications, saving an enormous amount of time and resources.
The Foundational Choice: Nickel vs. Cobalt
Before you even start prepping your lysate, you have to make a critical decision: will you use a nickel- or cobalt-based resin? This choice isn't trivial; it directly impacts your final purity and yield.
Nickel (Ni²⁺) Resins: These are the traditional workhorses of IMAC. They have a high binding capacity, meaning you can capture more protein per milliliter of resin. This often translates to a higher overall yield, making nickel a great choice for most routine purifications.
Cobalt (Co²⁺) Resins: Cobalt offers a more selective interaction. While the binding capacity is a bit lower than nickel's, it has less affinity for endogenous proteins that happen to have naturally occurring histidine-rich patches. This higher specificity can give you a purer product right off the column.
From my own experience, running a small-scale pilot with both Ni²⁺ and Co²⁺ resins is one of the smartest things you can do, especially with a new protein. It quickly tells you which metal gives you the best balance of purity and yield, preventing headaches down the line.
The sheer utility of this method is why the global protein purification and isolation market, where His-tag tech plays a huge role, was valued at USD 11.31 billion in 2025 and is projected to skyrocket to USD 29.72 billion by 2035.
Crafting Your Purification Strategy
A great His-tag protein purification isn't luck; it's the product of a smart plan. The decisions you make before you even spin down your first cell pellet will dictate your final yield, purity, and most critically, whether your protein actually works. This is the difference between a week of frustration and a clean gel ready for your publication.
Your first major decision point is a big one: will you purify your protein under native or denaturing conditions? The answer hinges entirely on where your protein is inside the cell and what you plan to do with it afterward.
Native vs. Denaturing Purification: The Fundamental Choice
If your end goal is to measure an enzyme’s activity, run a binding assay, or do anything that requires your protein's proper 3D structure, then native purification is your only option. This approach relies on buffers formulated to keep the protein folded, happy, and biologically active.
But here’s the reality: many overexpressed recombinant proteins fold incorrectly and pile up into insoluble messes called inclusion bodies. If your protein is stuck in this state, native buffers won't touch it. Your only way forward is to hit it with a strong denaturant—like urea or guanidinium hydrochloride—to unfold the protein and expose the buried His-tag. This is denaturing purification.
The choice is simple: if you need a functional protein and it's soluble, go native. If your protein is locked in inclusion bodies and you just need to get it out, denaturing is your solution. You can always attempt to refold the protein later.
Deciding between these two paths is a critical first step. Here’s a quick comparison to help you choose the right strategy for your protein and downstream goals.
Choosing Between Native vs Denaturing Purification
This table breaks down the key differences, helping you decide which approach is the best fit for your specific project.
| Parameter | Native Conditions | Denaturing Conditions |
|---|---|---|
| Protein State | Folded and biologically active. | Unfolded and non-functional. |
| Primary Goal | Isolate a functional protein for activity assays, structural studies, or interaction analysis. | Rescue an insoluble protein from inclusion bodies for refolding or antibody generation. |
| Buffer Composition | pH-buffered saline (e.g., Tris, HEPES) with salt. Lacks harsh chemicals. | Contains high concentrations of a denaturant (e.g., 6 M Guanidine-HCl or 8 M Urea). |
| Pros | Preserves protein function and structure. Fewer purification steps if refolding is not needed. | Allows for the purification of highly expressed but insoluble proteins. |
| Cons | Ineffective if the protein is in inclusion bodies. | Requires an additional, often tricky, refolding step to regain protein function. |
Ultimately, your protein's solubility dictates this choice. If it's soluble and you need it to be active, native is the way. If it's insoluble, you have no choice but to denature it first and hope to refold it later.
Building Your Buffers: Essential Recipes
Once you’ve picked a lane, it's time to make your buffers. While every protein has its quirks, it's always best to start with a proven recipe. Below are my go-to formulations for both native and denaturing preps.
For a standard native purification, these Bind, Wash, and Elute buffers are a solid starting point:
- Binding Buffer: 50 mM Tris-HCl (pH 8.0), 300 mM NaCl, 10 mM Imidazole. The low imidazole concentration is key for preventing weak, non-specific proteins from sticking to your resin in the first place.
- Wash Buffer: 50 mM Tris-HCl (pH 8.0), 300 mM NaCl, 20-40 mM Imidazole. Upping the imidazole here helps wash away more contaminants without prematurely eluting your target protein.
- Elution Buffer: 50 mM Tris-HCl (pH 8.0), 300 mM NaCl, 250-500 mM Imidazole. This high concentration of imidazole will outcompete the His-tag, releasing your pure protein from the column.
For a denaturing purification, the core logic is similar but with the crucial addition of a denaturant. Note the buffer system change.
- Binding Buffer: 100 mM NaH₂PO₄ (pH 8.0), 10 mM Tris-HCl, 8 M Urea, 10 mM Imidazole. Phosphate-based buffers tend to behave much better in the presence of high urea concentrations.
- Wash Buffer: 100 mM NaH₂PO₄ (pH 6.3), 10 mM Tris-HCl, 8 M Urea. By dropping the pH to 6.3, you protonate the histidines on many contaminating proteins, causing them to wash off while your His-tagged protein stays put.
- Elution Buffer: 100 mM NaH₂PO₄ (pH 4.5), 10 mM Tris-HCl, 8 M Urea. A final pH drop to 4.5 protonates the histidines on your tag, kicking the protein off the column.
Nickel or Cobalt: The Yield vs. Purity Trade-Off
The final piece of your strategic puzzle is choosing your resin. As mentioned earlier, Nickel (Ni-NTA) and Cobalt (Talon) resins are the two main options for His-tag purification, and they represent a classic scientific trade-off.
Ni-NTA resin is the workhorse of the two. It has a higher binding capacity, which means it can grab more protein per milliliter of resin. This generally translates to a higher overall yield. If your main goal is to get the maximum amount of protein, nickel is usually the right place to start.
Cobalt resin, on the other hand, is the specialist that delivers superior purity. It forms a slightly less aggressive bond with the His-tag and has a lower affinity for other endogenous proteins that might have histidine-rich patches. This selectivity means fewer contaminants co-elute with your protein. If your downstream application is sensitive to even minor impurities, cobalt is the premium choice.
I’ve seen many projects salvaged by a simple switch from nickel to cobalt to get rid of a stubborn contaminating band on an SDS-PAGE gel. If you have the time and resources, running a small-scale pilot prep with both resins can give you invaluable data to guide your large-scale strategy and guarantee a better outcome.
Your Hands-On His Tag Purification Workflow
With your strategy mapped out and buffers on ice, it’s time to get to the bench. This is where the theory ends and the real work of His-tag protein purification begins. We'll walk through the entire process, from cracking open your cells to banking your final, pure protein, focusing on the small details that so often make or break a prep.
Everything starts with one non-negotiable ingredient: a clean, clarified cell lysate. If you try to load a murky, debris-filled sample onto your column, you’ll clog it instantly. That’s a surefire way to ruin your expensive resin and waste a day’s work. Getting the cell disruption and clarification right is the first real hurdle.
Preparing a Clean Cell Lysate
The goal here is simple: break open the cells to free your His-tagged protein, then get rid of all the insoluble junk like membranes and, especially, genomic DNA. Sonication is the go-to method for most labs, and for good reason—it works.
A good sonication protocol isn't about blasting your sample continuously. It's about short, high-energy bursts followed by cooling periods on ice. This approach prevents your sample from overheating, which is a fast track to denaturing and aggregating your target protein. After sonication, you’ll notice the lysate is probably thick and viscous from all the released DNA. A small amount of DNase I will take care of that, making the sample much easier to work with.
Once lysis is done, the next move is a hard spin in a refrigerated centrifuge. A high-speed spin—think >15,000 x g for 30 minutes at 4°C—will pellet all the unbroken cells, membranes, and other large debris. Your soluble, His-tagged protein is now in the supernatant. Carefully decant it, and you've got your clarified lysate, ready for the column.
Loading and Binding Your Protein
Before your lysate ever touches the resin, you need to get the resin ready for it. This is called equilibration, and it’s about making sure the chemical environment of the resin perfectly matches your binding buffer. Skipping this step is asking for trouble.
Here’s the standard game plan:
- Remove the Storage Buffer: Gently resuspend the resin slurry and let it settle, then carefully aspirate or pour off the storage buffer (usually 20% ethanol).
- Wash with Water: Run a few column volumes of nuclease-free water through the resin to wash away any residual ethanol.
- Equilibrate: Now, wash the resin with at least 5–10 column volumes of your binding buffer. This step charges the immobilized metal ions and gets them ready to grab onto your protein’s His-tag.
Once the resin is equilibrated, you can load your clarified lysate. If you’re using a simple gravity-flow column, you can just pour the lysate on top and let it drip through. For a more sophisticated FPLC system, you’ll use a pump to load the sample at a precise flow rate.
This is the critical decision point where your choice of native vs. denaturing conditions really comes into play, dictating the entire workflow from here on out.
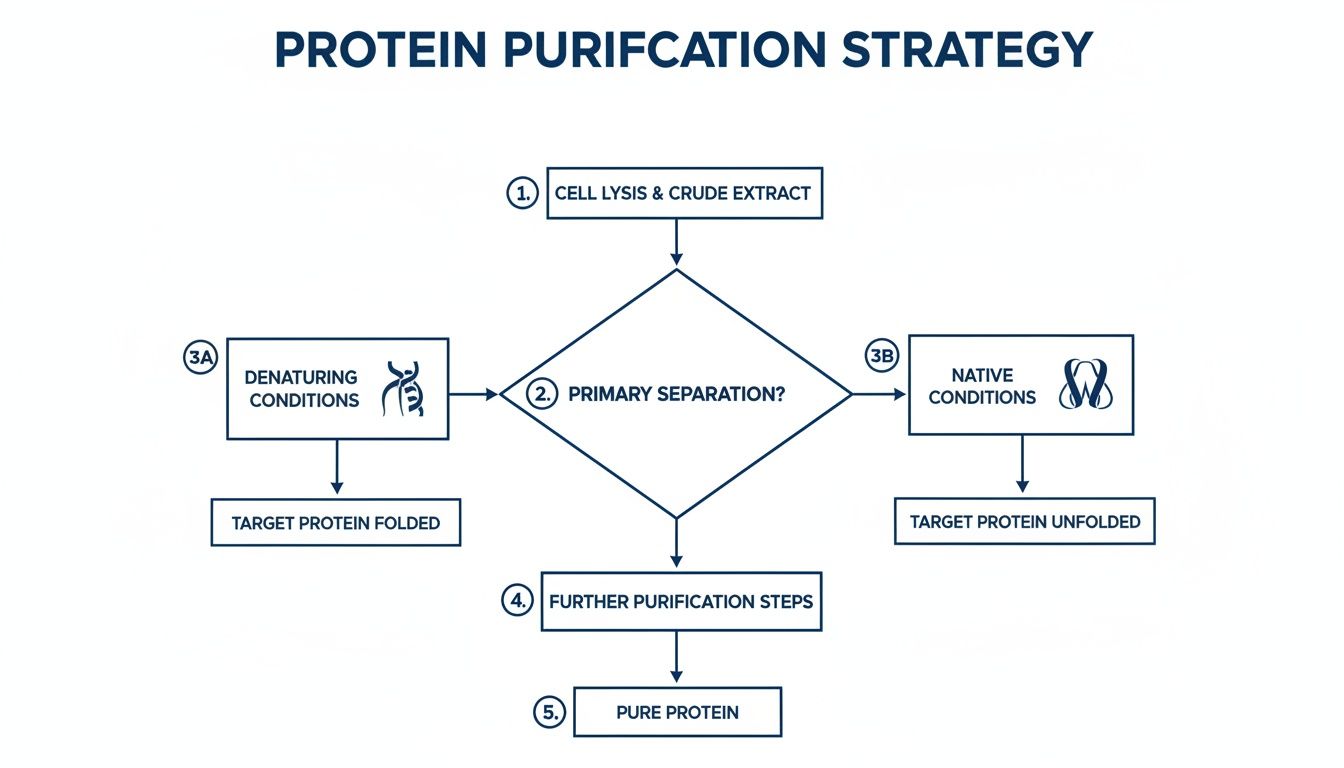
As the chart shows, your entire path forward depends on whether you need a folded, active protein (native conditions) or you’re trying to rescue an unfolded one from inclusion bodies (denaturing conditions).
Fine-Tuning the Wash and Elution Steps
After loading, your His-tagged protein is stuck to the resin. Unfortunately, so are some weakly-interacting, non-specific contaminants. The wash step is your chance to get rid of them. By washing the column with a buffer containing a low-to-moderate concentration of imidazole—somewhere in the 20–40 mM range—you can knock these nuisance proteins off without dislodging your target.
With modern resins, this part of the process can be incredibly fast. Some protocols report isolating 27 mg of His-tagged GFPuv protein from 100 ml of lysate in just 15 minutes. Others have pulled down 10 mg of mCherry from 200 ml of lysate in about 10 minutes, a huge time-saver compared to older methods. You can see more on these rapid purification results at takarabio.com.
Once the wash buffer runs clean, it’s time for the main event: eluting your protein. You have two main options:
- Step Elution: This is the quick-and-dirty method. You hit the column with your elution buffer containing a high concentration of imidazole (usually 250–500 mM) all at once. This instantly displaces your protein, which comes off the column in a single, concentrated peak.
- Gradient Elution: This is the more refined approach, typically reserved for FPLC systems. Here, you create a gradient that slowly increases the imidazole concentration. Proteins will elute at different points based on their binding affinity, which can give you an extra layer of purification.
My advice? Start with a simple step elution. It's fast, it's easy, and it works great for most routine preps. If you find you’re still co-purifying some stubborn contaminants, then a gradient elution is the perfect tool to bring in for optimization.
Post-Purification Cleanup and Advanced Techniques
You've got your protein, but it’s sitting in a high-imidazole buffer that can mess with downstream assays. The final move is to get it into a more useful buffer, like PBS. Dialysis is the classic method here: put your protein sample in dialysis tubing and let it sit in a large volume of your desired final buffer.
For more complex projects, you can even perform some slick moves directly on the column. If you purified under denaturing conditions, for instance, you can attempt on-column refolding by gradually swapping the denaturing buffer for a native one. Another powerful trick is on-column tag cleavage. Here, you add a specific protease that snips off the His-tag while your protein is still immobilized, letting you elute a pristine, tag-free protein. These advanced techniques add a whole new level of finesse to the basic His-tag workflow.
Troubleshooting and Optimizing Your Results

Getting a band on a gel after your first His-tag protein purification feels like a victory, but let’s be honest: that’s just the beginning. The real work starts now.
Is it the right protein? Is it pure? Is there even enough of it to use? Answering these questions is what separates a successful purification from a frustrating waste of time. This is where quality control and systematic problem-solving become your most important tools.
Confirming Protein Identity and Purity
Your first move is always visual confirmation. Running your eluted fractions on an SDS-PAGE gel is completely non-negotiable. It’s the fastest, most direct way to see what you’ve actually isolated and get a rough idea of its purity and molecular weight.
A single, sharp band at the expected size is what you’re hoping for. Of course, reality often serves up extra bands, faint bands, or no band at all.
But even a perfect-looking band isn't enough. You have to prove it’s your protein, and for that, a Western blot is indispensable. Using an antibody specific to the His-tag, you can confirm that your purified band is, in fact, the tagged protein you were after. A strong signal on the Western that lines up perfectly with the main band on your Coomassie-stained gel is a huge confidence booster.
This verification step is so central to modern biology that it fuels a massive market. Global demand for Histidine Tag antibodies was valued at USD 1.43 billion in 2025 and is projected to hit USD 2.22 billion by 2029. That growth tells you just how critical these antibodies are for confirming results in labs everywhere. You can learn more about the growing His-Tag antibody market on researchandmarkets.com.
Once you’ve confirmed its identity, you need to quantify your yield. The quickest method is measuring absorbance at 280 nm (A280) with a spectrophotometer. Be warned, though: this reading can be deceptive, since contaminating nucleic acids also absorb strongly near this wavelength. For a much more accurate measurement, a colorimetric method like the Bradford or BCA assay is the way to go.
Pro Tip: Always run a small aliquot of your pre-column cell lysate on the same gel as your purified fractions. This "input" lane is your baseline—it shows you how much target protein was there to begin with and helps you judge how efficient your purification really was.
Tackling Common Purification Problems
Even the most meticulously planned protocol can go wrong. Low yield, stubborn contaminating bands, and protein degradation are frustrations every researcher has faced. The key is to diagnose the problem methodically instead of just trying random fixes.
Let’s break down the most common headaches and how to solve them.
If you’re seeing low or no yield, the issue could be anything from poor expression to an inaccessible His-tag or overly harsh lysis conditions. Before you blame the purification itself, run a Western blot on your crude lysate to confirm the protein is actually being expressed. If it's there but not binding, it might be hiding in inclusion bodies or the tag might be folded into the protein's core, completely hidden from the resin.
On the other hand, if your gel is littered with contaminating bands, your wash steps probably aren't stringent enough. Many native E. coli proteins have histidine-rich patches that cause them to non-specifically stick to Ni-NTA resin. You can fight this by bumping up the imidazole concentration in your wash buffer or by adding a small amount of a non-ionic detergent like Tween-20.
This table covers the most frequent issues I’ve run into and the solutions that have saved more than a few of my own experiments.
Solving Common His Tag Purification Problems
| Problem | Potential Cause | Recommended Solution |
|---|---|---|
| Low Protein Yield | The His-tag is inaccessible or buried inside the folded protein. | Perform a small-scale test purification under denaturing conditions (8 M urea) to see if yield improves. If it does, your tag is likely hidden. |
| Contaminating Bands | Weakly-binding proteins are not being removed during the wash step. | Increase the imidazole concentration in your wash buffer in 5-10 mM increments to improve stringency and wash away non-specific binders. |
| Protein Degradation | Endogenous proteases from the cell lysate are chewing up your protein during purification. | Add a broad-spectrum protease inhibitor cocktail to your lysis buffer right before sonication. Critically, work on ice at all times. |
| Protein Precipitation | The high imidazole concentration in the elution buffer is causing your protein to crash out of solution upon collection. | Elute into tubes already containing your final, imidazole-free buffer. This will immediately dilute the imidazole and stabilize your protein. |
Another huge culprit for messy gels is protein degradation. If you see a smear of smaller bands below your target protein, you can bet that proteases are at work. The solution is simple but absolutely critical: add a protease inhibitor cocktail to your lysis buffer and keep your samples ice-cold at every single step. From cell pellet to eluted protein, 4°C is your best friend.
Finally, don’t underestimate the power of choosing the right expression host from the start. Some E. coli strains, like BL21(DE3), are protease-deficient and can dramatically cut down on degradation before it even starts. If you consistently struggle with protein stability, switching to a better expression strain is a smart, strategic move that can solve the problem at its source.
Scaling Up and Exploring Advanced Applications
So you’ve got your small-scale prep dialed in. The protocol is solid, the protein is pure, and everything looks great. But now you need more of it. A lot more. Whether it's for structural biology, animal studies, or a high-throughput screen, the jump from milligrams to grams is a common hurdle in His-tag protein purification.
Scaling up isn't as simple as just using a bigger column. You have to start thinking differently about your hardware and your process. What worked perfectly for a 5 mL benchtop prep will become a huge bottleneck when you're trying to process liters of cell culture.
Moving Beyond the Benchtop Scale
The first thing to reconsider is your resin. The standard resin that gives you beautiful results in a mini-prep will get completely overwhelmed by large volumes of lysate. You need to shift to a resin specifically built for high capacity and high flow rates. This lets you push more lysate through the column faster without losing your protein.
This is also the point where most labs finally make the switch from manual gravity-flow columns to an automated Fast Protein Liquid Chromatography (FPLC) system. An FPLC brings some serious advantages to large-scale work:
- Reproducibility: The system runs precise gradients and maintains exact flow rates every time. It completely removes the human error and variability that can ruin a manual prep.
- Throughput: You can set it up to run overnight, completely unattended. This dramatically increases how much protein you can process in a single week.
- Monitoring: Live UV monitoring gives you a real-time chromatogram. You can see precisely when your protein is binding, washing away contaminants, and eluting. This data is invaluable for optimizing your run.
Making the leap to an FPLC might feel like a big step, but it’s the logical next move. You'll use the same buffer recipes you've already optimized, but the system's control and monitoring will give you an unprecedented level of insight into what's actually happening during purification.
His-Tagged Proteins as Discovery Tools
A successful His-tag purification is often just the first step. Once you have a highly pure protein, you can start using it to answer much more interesting biological questions. Your immobilized protein is now a powerful tool for exploring cellular machinery.
This is one of my favorite parts of protein biochemistry. Your purified, resin-bound protein isn't just a final product; it's a functionalized surface you can use as "bait" to fish for other interacting molecules.
One of the most powerful ways to do this is with a pull-down assay. Here, your immobilized His-tagged protein serves as the bait. You take your resin, incubate it with a complex mixture like a cell lysate, and any proteins that naturally bind to your bait protein get "pulled down" with it. After washing away everything that doesn't stick, you can elute these newly discovered binding partners and identify them using mass spectrometry. I've used this exact technique to map out completely new protein-protein interactions in critical signaling pathways.
Of course, getting large quantities of ultra-pure protein is also a prerequisite for some of the most demanding applications in biology, like X-ray crystallography or cryo-electron microscopy (cryo-EM). These structural biology methods demand a concentrated, homogenous, and highly stable protein sample—a standard that a well-optimized, scaled-up His-tag protocol is perfectly suited to deliver.
Troubleshooting Your His-Tag Prep: Field Notes from the Bench
Even the most buttoned-up protocol can go sideways. When it comes to His-tag purification, a few classic problems pop up time and time again. Think of this as a quick-reference guide from the trenches, designed to get you past the most common sticking points and back on track.
Why Isn't My His-Tagged Protein Binding to the Column?
This is the big one. The most frustrating moment in any purification is watching your target protein flow right through the column. If your protein isn't sticking, a few usual suspects are likely to blame.
First, is the His-tag even available to bind? It's surprisingly common for the tag to get buried inside the protein's final folded structure, completely hidden from the resin. A quick way to diagnose this is to run a small-scale purification under denaturing conditions. If the protein suddenly binds, you've found your culprit—the tag is inaccessible.
Next, take a hard look at your lysis buffer. Any residual imidazole from your cell culture media will compete directly with your protein for binding sites on the resin. Even worse, strong chelators like EDTA will strip the nickel or cobalt ions straight off your column, making it completely useless. If you suspect either, dialyzing your lysate before loading is a smart move.
Finally, double-check your pH. For Ni-NTA resins, the sweet spot is a pH between 7.5 and 8.0. If your buffer is too acidic, the histidine residues become protonated, and they can’t form the coordinate bond needed to grab onto the metal ions.
How Do I Get Imidazole Out of My Purified Protein?
That high concentration of imidazole you used for elution is great for getting your protein off the column, but it can wreak havoc on downstream applications, from functional assays to crystallography. Getting it out is non-negotiable.
The gold standard for removing imidazole is dialysis. You simply place your protein solution into dialysis tubing and let it sit in a large volume of an imidazole-free buffer (like PBS or Tris). The small imidazole molecules diffuse out, leaving your pure protein behind.
If you're short on time or working with a small volume, a desalting column is a fantastic alternative. These size-exclusion columns perform a rapid buffer exchange in minutes, cleanly separating your large protein from the small imidazole molecules.
Can I Reuse My Ni-NTA or Cobalt Resin?
Absolutely—and you should. Reusing affinity resin is a lab-tested way to keep costs down. After you've eluted your protein, you just need to strip and recharge the resin to get it ready for the next run.
The regeneration process is pretty straightforward:
- Strip: Wash the column with a strong chelator like EDTA to get rid of all the old metal ions.
- Clean: A wash with a strong base, like 0.5 M NaOH, will remove any stubborn proteins that didn't elute properly.
- Recharge: After rinsing thoroughly with water, you recharge the resin with a fresh metal salt solution, such as NiSO₄ or CoCl₂.
- Re-equilibrate: The final step is to equilibrate the column with your binding buffer, and it's ready for another round.
Just be sure to consult the protocol from your specific resin manufacturer, as they might have their own recommended procedure.
At PurMa Biologics, we know that great science is built on a foundation of reliable reagents and robust protocols. Whether you need high-quality cell culture media, buffers, or expert services like protein expression and purification, we're here to provide the tools your lab needs to generate consistent, publication-ready results. Accelerate your research by exploring our complete solutions at https://www.purmabiologics.com.